Hedgehogs are something of a novelty here in Europe and my kids are obsessed with them. Luckily there are many wonderful books which feature a hedgehog for a main character. Through these stories they have learned more about the behaviors of hedgehogs and enjoyed some well written books.
Hans My Hedgehog: A Tale from the Brothers Grimm is a retelling of a classic tale. A child which is half-man and half-hedgehog grows up as a bit of an outcast. But just like Beauty, the hedgehog man turns into a handsome prince upon finding love. In this version, many of the original details were changed which gives the story a much more positive tone than the original.
The Tale of Mrs. Tiggy-Winkle (Peter Rabbit) - Mrs. Tiggy-Winkle is a washer woman who does laundry for all the forest creatures. This is a sweet story which contains many sophisticated words that help to build little vocabularies.
The Beginning of the Armadillos by Rudyard Kipling is a legend which explains how armadillos came to be. When the fox tried to capture a hedgehog and a tortoise, he got confused about who was who. As he straightens himself out the hedgehog and tortoise learn each others tricks and slowly change form.
Hedgie's Surprise by Jan Brett tells the story of a Tomten who likes to eat eggs for breakfast. When the hen gets fed-up, Hedgie helps the Tomten to stop taking the hen's eggs with a trick. Many of Jan Brett's books feature hedgehogs, but this one is our favorite.
When the hedgehog in Miss Jaster's Garden is sprinkled with seeds his skin begins to itch. He ponders whether he will become a vegetable or flower garden before leaving the garden to do a dance. Miss Jaster sees her flowers leaving and Hedgie is mistaken for a thief. Luckily the police officer straightens out the situation.
Hedgehog, The (Eye View Library S.) contained far more information on the habits of hedgehogs than any of the other stories. Written in story format, I recommend this book with one bit of caution. It describes how the male hedgehog runs in circles around the female for three hours before she allows him to mate. Some find this page too graphic for little ones.
* I did not receive any compensation
for this recommendation. I'm just a homeschooling mom who has found
many products that I like. If you're interested in the products I
recommend on this blog I want to make it easy for you to find them. ** I am an Amazon associate and
receive a small portion of the sales on orders made after clicking in
from this site, which I promptly spend on homeschooling books and
supplies for my children.
These dolls are actually quite simple to make, and aside from the pants the boy is wearing, no sewing is required.
Materials
White or Skin Colored Fabric
Ball of Yarn
Cotton or Scraps to Stuff Head
Scissors
Clothing Fabric
Glue Gun (Optional)
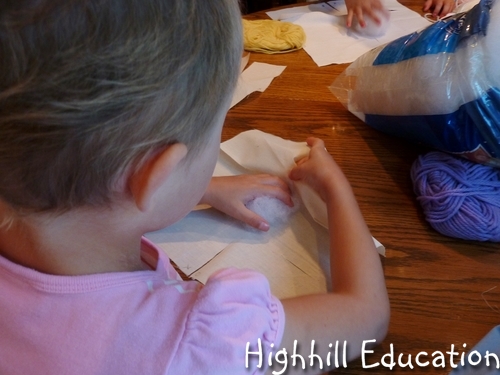
Cut the fabric into a 12 inch square. Fold it in half. (Fold is at top in photo). Cut a slit down the center approximately 4 inches long. Cut slits approximately 3 inches long 1.25 inches below fold.
Fold up the fabric and mark with X's and O's as shown in the picture. The X's will be joined together to form one leg and the O's will be joined together to form the other leg after the head is formed.
Place a small ball of cotton in the middle of the fabric to form the head.
Fold the fabric around the head and tie a knot in the yarn around the neck.
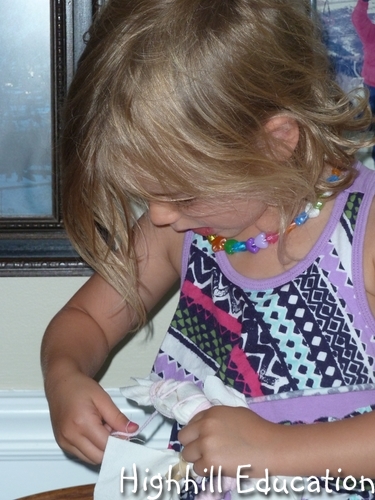
Find the pieces marked with X's and O's and join them together to become legs. Place rubber bands around the legs if desired. Pull out two fabric pieces to become arms.
Begin wrapping yarn around one of the arms.
Continue wrapping yarn until the hand is reached.
At the hand begin wrapping the yarn back up the arm. At the armpit wrap the yarn around the neck a few times and then wrap down and back around the other arm.
Once both arms are wrapped, wrap yarn in an X shape around the middle.
Wrap down and up each leg. Then wrap yarn around the tops of both legs together to form the belly.
One common problem is the yarn unravelling at the foot or hand. To prevent this leave plenty of fabric for the hands and feet.
Another way to prevent this problem is to dab a little glue on the hands and feet with a glue gun.
If the yarn has already unravelled, consider placing a cast on the doll.
The clothes can be made with a rectangular piece of fabric with a hole in the center for the head and a piece of yarn or ribbon for the belt. The edges of this fabric were sewn to prevent unravelling of the fabric. Using felt or fleece would prevent the need to sew.
To create the hat cut a triangular piece of fabric and tie it in a knot at the back of the head.
To sew the boys pants cut a square piece of fabric, put a casing in the top with a string or strip of elastic and cut a slit and sew it up to form the legs.
To see our other craft activities please visit our Craft Page.
We built rectangles using two different colors of Cuisenaire Rods and then used skip-counting with a third color to determine how many square units were in each rectangle.
Since Speed!
is a skip-counting game and Cuisenaire Rods
are a math manipulative, they go great together.
The blue Cuisenaire Rods are 9 cm long and the white rods are 1 cm long.
The first rectangle consisted of eight blues and eight whites.
Since the total of a white and a blue is 10 cm, the number of square units in this rectangle was easy to calculate (8 x 10 = 80).
When the 4 cm purple rods and the 5 cm yellow rods were combined into 9 cm rods, the number of square units was more difficult to determine.
Eight rows of 9 cm lengths were used in the rectangle.
Using the Speed! cards was a unique way to determine the unit area.
On the back of box and the front of each card a visual representation of the skip-counting number chain including numbers is shown.
9 x 9 = 81 = 9 x 4 + 9 x 5 = 36 + 45
The Nine Speed deck was used to look up the 81, the Four Speed deck was used to look up the 36 and the Five Speed deck was used to look up the 45. After my daughter added 36 and 45 she was excited to learn the unit area could be determined two different ways.
Cuisenaire Rods are a great math manipulate especially for children who need to figure out concepts in order to understand and retain them and Speed! is a great companion.
* I did not receive any compensation
for this recommendation (Cuisenaire Rods). I'm just a homeschooling mom who has found
many products that I like. If you're interested in the products I
recommend on this blog I want to make it easy for you to find them. ** I am an Amazon associate and
receive a small portion of the sales on orders made after clicking in
from this site, which I promptly spend on homeschooling books and
supplies for my children. *** Highhill Educational Supplies is my company. I am the creator of the game Speed!
A barometer is a device used to measure air pressure. In general, the pressure is higher near sea level since there is so much air above pushing down. Conversely, air pressure is lower in the mountains since there is less air above.
Elevation effects air pressure and, it is also effected by temperature. Warmer temperatures result in low pressure air since the molecules spread apart. Cold temperatures result in air molecules packed closer together and higher pressure.
Weather and Air Pressure explains how temperature effects air pressure.
The video Air Pressure Explained details a few simple projects kids can do to understand air pressure.
Barometers and Weather
Barometers are important devices in forecasting weather. Moisture is
stored in low pressure air. Therefore, if the barometer is dropping it
can mean a storm is coming. Often when weathermen speak of hurricanes,
low pressure is discussed.
High pressure systems are
commonly associated with nice days. The high pressure keeps the moisture
out, but if a high pressure hangs over an area too long it can mean
drought.
Since air likes to move from areas of high pressure towards areas of low pressure, barometers can help to predict wind.
Make Your Own Barometer
Since mercury changes its size so dramatically in accordance with
pressure, it is the key element in many barometers. However, since it is toxic and difficult to obtain, our barometer was constructed from an empty glass jar, balloon, straw and tape.
The end was cut off a balloon and the remainder was secured to the mouth
of a jar with tape. A straw was taped to the balloon and an triangular
piece of card stock was mounted to the end of the straw to serve as an
indicator.
The barometer was placed near the wall and pressure lines were drawn onto a sheet of paper behind the barometer. Over time we could see the indicator move up and down.
Week 3: We made geometric designs similar to those found in mosques and Moorish structures.
Perhaps one of the greatest fabricated eras of modern history books covers the period when the Moors lived in Spain. Commonly left out of school texts, it's sad that this culture has been misunderstood and forgotten.
I first learned of the Moors during a trip to Spain followed by a trip to Gibraltar. The Moors entered Spain from Africa through the Straits of Gibraltar during a time when the area was in turmoil. The Roman Empire had fallen and the economy along with it. Along with their Muslim religion, the Moors brought water technology, new fruits and social structure which enabled the region to recover. Under Moorish rule, while the rest of Europe was in the dark ages, civilization in Spain thrived.
Paper had been invented long before by the Ancient Chinese, but the Europeans were still writing on parchment. The Moors brought paper technology into Europe. Before entering Spain, the Moors, which came from Turkey and areas further to the east had migrated across northern Africa. When they came across the library in Alexandria, Egypt they learned about the Ancient Greeks and Romans and began translating documents. The new knowledge allowed the Moors to continue the work of the Ancient Greek philosophers and scientists.
Their preservation of the ancient texts continued for almost one thousand years. Then, during the middle ages the information reached Europeans via Moorish Spain. In the Spanish city of Toledo ancient texts were translated from Arabic into Latin and Germanic languages the Europeans could understand. Scholars from Brittan, France and Germany traveled to Toledo to study the ancient information. In addition to the documents, perhaps the greatest innovation the Moors brought to Europe was their understanding of mathematics along with a complete set of new numerals.
When the Moors Ruled Europe is a documentary which provides a perspective on the Moorish occupation of Spain quite different than what is taught in most textbooks. I highly recommend adults and older children studying the middle ages make some time for this video. Although the majority of the video is suitable for much younger children, the length can put a strain on their attention spans.
After learning about the Moors, we created Moorish geometric designs. Actually, several math art patterns were completed in preparation for this project.
Finding Shapes in Circles
Creating Geometric Designs in Seven Circle Grids
Finding Shapes in Five Circle Grids
Repeating the process for creating geometric designs using seven circle grids, new designs were created. The process was exactly the same. The only difference was that by repeating the exercise, we were able to see many more shapes and patterns in the grids resulting in more sophisticated designs.
My design was created by connecting specific points within the circles to create a continuous line rather than repeated individual shapes.
The pattern seen in my 12 year old daughter's design can be found many places in Muslim art. She was thrilled to find she created a Muslim design that had been used before.
My son created five rows each containing a unique pattern.
Jemma colored the flowers in her seven circle grid. There is a distinct pattern in the center of the design where two red triangles in the center are followed by two purples on both sides, then greens and light blues.
She created another pattern using large triangles.
Creating the grids was a valuable learning activity, but to repeat the project grid creation becomes a chore. So I created some basic grids. Please feel free to download them for personal or classroom use.
Please sign-up to follow Highhill Education by email as we journey through the middle ages.
Check out these great blogs full of educational activity ideas.