Showing posts with label Crafts. Show all posts

Free Photo Editing Unit Study

Computer skills are essential to success in our modern world. One way to build computer skills is to focus on a hobby or interest which incorporates computers as a tool. Kids who are interested in photography can increase their photography knowledge and computer skills by learning to edit photos.


gIMP is a free downloadable photo editing software package. It contains common photo editing capabilities such as altering brightness and colors of photos, as well as cropping and rotating. In addition photos can be meshed together, silhouettes can be created and so much more.

Download gIMP, open the software and begin playing around with it. Then watch and read on-line tutorials - gIMP-Tutorials and gIMPpology.

Here are some examples of photo edits that can be done with gIMP.


Custom Photo Album

Once you have edited a number of photos assemble a photo album.

iPhoto or the Walgreens online site are only two of numerous options available to create a photo album.


Refinishing Furniture with Kids

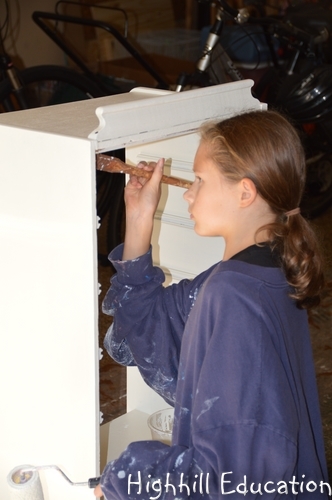
My daughter refinished a cabinet.

This year the kids have lots of control over their education in that they can select research topics and activities from a pre-approved list or suggest their own. One of the items on the list was refinish the small cabinet in the family room. My hands-on crafty daughter selected this item right away.

After she decided to refinish the cabinet, I told her she would have to do some research and put together a plan before starting. Therefore, she began by spending an afternoon watching DIY videos on youtube and then describing her plan. Once the plan was in place, we headed off to Home Depot to get supplies.

Since she wanted to paint the cabinet instead of restain it, we learned that she didn't need to fully remove the existing stain. Thus, her first major task was sanding.


But before sanding, she removed the hardware from the front door and removed the front door from the cabinet. I doubt the hardware had ever been cleaned. So she researched how to clean brass and learned she should coat it in catsup and let it sit for an hour and then wipe it clean. She did and now the hardware really shines.


Sanding even a small cabinet sounds like a big task for a little girl, but she actually had some prior exposure to sanding so had an idea of what to expect. A few years ago we did a major family project and refinished twelve Adirondack chairs.


Since there were so many chairs and foot rests, everyone in the family had an opportunity to use an electric sander.


We all got to stain, and stain some more.


I think, seeing such a dramatic improvement in the chairs motivated her to select this project.


During the sanding process, the back of the cabinet practically fell off because it was so old. So my daughter went back to the store, this time with her dad, and purchased some wood to create a new back for the cabinet.

Together they measured and marked the new back piece and then my husband cut it out.

 Once the sanding was complete, she began with primer and finished up with paint.


The entire project ended up taking about three weeks. She had to take a few days off because of a sore throat and a few more days off because the humidity was extremely high. Nevertheless, she persevered through the entire project and now is very proud of her finished cabinet. We are proud of her too.

Fabric Stenciling Project for Kids

We used shaving cream and ink to create stenciled and tie dye style shirts.

Our TSC Designs inks and stencils were purchased as a kit at a local quilt show, but all the same products are available on their website.

 TSC Fabric Inks

 Collection of stencils

First fill a plate or tray with shaving cream.

 Next, use a dropper to place drops of ink on the shaving cream.

 With a Q-tip or a toothpick, swirl the ink through the shaving cream.

 Take a t-shirt or some fabric and smoosh it into the shaving cream.


 Lift the fabric out and scrape off the shaving cream.

 Another method is to use a sponge to stamp the design onto the fabric with a stencil.

 When finished, the fabric needs to be left to dry and then ironed to set the dye.

This project was fun and a little messy. It was a great way to spend a sunny afternoon outdoors. The book from TSC Designs has complete instructions and a few more ideas on ways to use the ink. Have Fun!

New Nation Crafts: Quilting, Felting and Embroidery

My daughter quilted, felted and embroidered like the Americans of the mid to late 1800's.

Although quilting, felting and embroidery were known in Early American times, they were not the handicrafts which kept most women busy. Opposite to popular belief, most Early American women were kept busy sewing, spinning and knitting as these handicrafts were more essential to their survival. It was only the wealthiest of early Americans who could afford to spend time quilting, embroidering and felting. However, by the mid to late 1800's industrial producers of cloth changed the availability of materials. It was during these later times when American quilting gained popularity.

Since we are a family who loves fiber and fabric based handicrafts, my daughter did all three.

Quilting

Once industrial produced fabric became available in America, the popularity of quilting increased. Contrary to popular belief, most quilts were created from new fabric. Patchwork is actually the word for cutting out and piecing together different fabrics. Quilting refers to the decorative stitching which holds the patchwork together. Regardless, my daughter spent time working on the quilting/patchwork process.

First she created a design and used a protractor to help her create the pieces for her design.

Next she cut out pieces of fabric.

Then she stitched them together.


Finally she ironed the seams of the stitched pieces. Currently, she is no where near completing the quilt she designed as she is a child who much prefers short-term projects. I'm not sure if she will ever finish this project, but am happy she has a good understanding for the effort involved.

Felting

There are several different methods for felting. Fibers from sheep and other animals will shrink and cling together after agitation. This can be accomplished with long sharp needles, or with soap and water. Many of us have accidentally felted wool sweaters in the washing machine and are surprised how dramatically small large sweaters can become. My daughter chose to create a purse by first knitting yarn with very large needles and then shrinking the knitted purse down to size.

 Following a pattern from the book Pursenality Plus, she created her purse.

 Next she squeezed warm soap and water through the purse for several hours until it shrank down to size.

Finally she stuffed her purse with treasures and carries it around town.


Embroidery


Today machines are used to make dynamic embroidery designs like this hedgehog created on my mother's machine. After the 30 minutes or so required to line up the design, program the machine, and place the fabric into a hoop with proper stabilizing papers above and below, the machine only takes about 30 minutes to whip out a finished product.

In the past simple embroidery designs took much longer. My daughter spent about 10 hours working on her embroidery sign for her room.

Like hand knitting a sweater, creating a full sampler must have taken weeks to months. Maybe I should invest in a knitting machine?

To see more American History lessons for kids please visit our archives on our History Page.

For more great educational activities check out these blog hops.

Fiber Field Trip

My daughter and I went to Fiber Festival.

Each year at the end of August, the Michigan Fiber Festival is held at the Allegan County Fair Grounds. Fiber comes from furry animals and is used in a variety of crafts. Sheep by far are the stars of the show, but rabbits, alpacas and other animals are also included. The festival lasts for five days with full day, half day and mini workshops offered on four of the days and vendors from around the world on three days.

Workshops in knitting, crocheting, weaving, felting, dying, basket making and soap making were offered. My daughter and I each signed up for two different full-day workshops.

1. Wet Felting

My favorite workshop was using wet-felting techniques to create a wall hanging. Beginning with a pre-shrunk length of fabric, we added bobbles, yarn, ridges, and voids to our sheet before soaking it with soapy water and agitating it to make it stick together and shrink.

In this class each student started with a blank canvas and created unique designs. Everyone's wall hanging turned out vastly different. The commonality was the various techniques used to create the designs. Because of the free flow and creativity offered by this class I was immediately hooked with the craft. (It was the first time I ever wet felted.)

2. Braided Rug

By braiding together lengths of clean fiber, felting them in a washing machine cycle with hot water and cold rinse and then sewing them into a circle we created rugs. This technique results in beautiful rugs that will last a lifetime. The complete technique is explained in the teachers book The Shephard's Rug.

3. Dying the Shibori Way
Dying the Shibori way is like advanced tie dye. Instead of just using rubber bands to create designs in fabric dipped into different dye baths, the Shibori method uses stitches. To create her chicken my daughter sketched her design and then used various stitches which included sewing lentils and beans into the fabric before dying. After dying all the stitching was removed.

4. Rug Hooking


This sheep was created from a kit supplied by the teacher. While my daughter enjoyed the class, she said the technique could have been easily learned with a book. There are many on Amazon.

Fiber festival is not a typical school field trip, but when you encourage your children's interests nothing really is typical. We can't wait to return next year and my 9 year old daughter is looking forward to her first class at fiber festival as well.


Check out these great blog hops for more educational activity ideas. 

Easy Felt or Fleece Flower

Following the directions in Fun-to-Wear Fabric Flowers, my daughter made a simple felt flower.

Each morning I read to my daughter. Usually we read a story or two and then directions for a simple sewing project. She knows when reading time is over she has free time and sewing is not a requirement. It's amazing how often she goes onto make whatever we just read about. :)

This simple flower project took her only a few hours to complete. First she cut a strip of orange felt approximately 4 inches by 22 inches long. The strip was folded in half and slits were cut into the folded side making sure not to cut all the way through to the other edge of the the strip.

Next, the slitted strip was coiled into a flower shape and a needle with thread was shoved through the base several different times to hold the flower in place.

 Perhaps she will use a hot glue gun to attach her flower to a barette, or make a second flower and attach them to a pair of shoes.


Looking for more activities to do with children? Be sure to check out the pages of this blog; Math, Language Arts, Science, History, Geography, Arts and Crafts and these other great Blog Hops.
Related Posts Plugin for WordPress, Blogger...