
This is a year long, secular, free Earth science unit study perfect for
kids in grades 3rd-5th which can be adapted for older or
younger children. It is broken into five parts which cover the formation of the Earth and Earth's atmosphere, advanced mapping skills, biomes, water, and the ever changing Earth due to volcanoes, tsunamis, and earthquakes. The first part of this earth science unit study takes approximately six
weeks to complete and covers the formation of the Earth, Earth's layers,
atmosphere, and magnetic field. The lessons are activity intensive but also incorporate books, video documentaries, research and discussions opportunities.
Week 1 - Formation of the Earth
Week 2 - Earth's Layers
Week 3 - Atmosphere
Week 4 - Atmospheric Pressure - Barometer
Week 5 - Wind Speed - Anemometer
Week 6 - Magnetic Field
Week 2 - Earth's Layers
Week 3 - Atmosphere
Week 4 - Atmospheric Pressure - Barometer
Week 5 - Wind Speed - Anemometer
Week 6 - Magnetic Field
Week 1: Formation of the Earth
Watch the video documentary Birth of the Earth and make almond cookies to model how the Earth was made.
According to scientific theory, the Earth was formed 5 billion years ago from the remains of a super-nova explosion. Some stars grow to gigantic sizes and explode at the end of their life cycles. These super-nova explosions leave behind huge amounts of dust and debris. Eventually the debris orbits a new star. Over time, static electricity holds the tiny bits together. As the bits combine and grow larger in size, gravity between them attracts them to one another. With yet more time, the dust particles can combine to form rocky asteroids, meteors and planets.
Watch the video Birth of the Earth which explains the entire process, as well as
how the moon was formed. Did you know scientists believe there were
originally two moons orbiting Earth?
To simulate the Earth formation process make almond cookies in a food process by combining raisins, dates, almonds, walnuts, oats, salt, water and a teaspoon of schnapps or vanilla extract.

The whole nuts represent the star at the end of its life-cycle.

According to scientific theory, the Earth was formed 5 billion years ago from the remains of a super-nova explosion. Some stars grow to gigantic sizes and explode at the end of their life cycles. These super-nova explosions leave behind huge amounts of dust and debris. Eventually the debris orbits a new star. Over time, static electricity holds the tiny bits together. As the bits combine and grow larger in size, gravity between them attracts them to one another. With yet more time, the dust particles can combine to form rocky asteroids, meteors and planets.
To simulate the Earth formation process make almond cookies in a food process by combining raisins, dates, almonds, walnuts, oats, salt, water and a teaspoon of schnapps or vanilla extract.
The whole nuts represent the star at the end of its life-cycle.
When the food processor is turned on, the star blows up into tiny bits of nuts that don't stick together.

Over time add dates and raisins. Watch the planets begin to form with the gravity of the food processor.

Add the rest of the ingredients, and watch the planets increase in size.

It may become one big sticky mass. Help it form into smaller planets by rolling chunks of the mass into balls.

The balls represent the planets. - No cooking required.
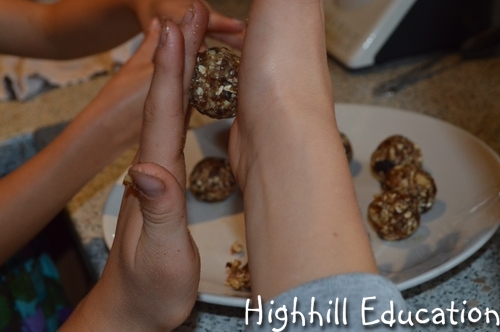
Notice how the planets are all different sizes. Feel free to eat your planets.

Week 2: Earth's Layers
Beginning with the birth of a hurricane, the film Earth from Space covers many Earth science topics that are covered in Highhill Education's free earth science unit studies. Off the coast of Antarctica, when the ice freezes, saltwater sinks rapidly to the bottom of the ocean creating currents which help to regulate the Earth's temperature. Hurricanes actually drop the temperature of the ocean by releasing heat into the atmosphere. Everything is connected and the common thread is the Earth. Watch the Nova video Earth from Space.
Go on a hunt to find objects that have layers and a core. Compare the objects with the Earth. Here are a few ideas.
Just like an egg, our Earth is broken into layers. It is hottest at the core in the center. Liquid magma surrounds the core in the mantle, and although the crust varies in thickness, it is very thin in comparison to the diameter of the Earth. Hard boil an egg and cut it in half. Compare the egg's layers with the Earth's layers.

An apple has a thin skin similar to the crust of the Earth. Inside, the
core is shaped like a star, so the thickness varies just like the
thickness of the Earth's layers vary at different locations. Cut an apple in half and compare the layers with the layers of the Earth.

The pit of a plum is covered with skin. This is similar to the way the Earth's core is broken into an inner and outer core. Cut a plum in half and compare it's layers with the layers of the Earth.

Draw a cross section of the Earth showing the different layers. Try to make the thickness of each layer proportional with the actual layers. In this drawing the dark ring around the outside is the crust. The red and orange show the mantle changes a bit with depth, and the yellow and white in the center are the inner and outer core.

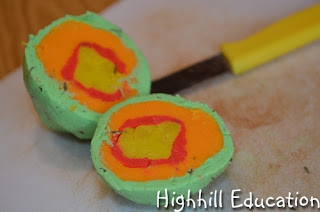
Create a model of the Earth with layers of dough. Add salt, water, spices and oil to the crust layer to represent
rocks, coal, gold, diamonds or animal bones that may be found in the surface layer.

 Once the models are complete, slice them open so the layers can
be seen. This model shows the inner core - yellow, outer core - red,
mantle orange, and crust - green.
Once the models are complete, slice them open so the layers can
be seen. This model shows the inner core - yellow, outer core - red,
mantle orange, and crust - green.


Week 3: Atmosphere
There are layers above the Earth, just like there are inside it. Our atmosphere is comprised of five layers; troposphere, stratosphere, mesosphere, thermosphere and exosphere. Over the past 60 years scientists have done extensive studies on the various layers. In the 1950's Joseph Kittinger performed a series of high altitude jumps. Project Excelsior was an important precursor to space exploration. From 19 miles above the ground, in the stratosphere, he made his final successful jump.
Oxygen fills our atmosphere, but it hasn't always been that way. Over 2.5 billion years ago tiny cyanobacteria were the first known living organisms. They were able to convert the carbon dioxide in the atmosphere into oxygen. Today, oxygen is produced by green plants which contain an organ which was derived from cyanobacteria.
After watching the video, do these activities to learn more about our atmosphere.
Activity 1: Atmospheric Layers - Blankets
Materials
5 blankets

Activity 2: Air Expands as it Rises
Materials
glass
straw
cooking oil

Activity 3: Air Pressure
Materials
Hot Water/Steam
Cold Water/Ice
Empty Water Bottle
Even though air cannot be seen it is a powerful force. Our bodies are uniquely designed to withstand the pressure. To visually see the power of air pressure, cool hot air inside a plastic bottle. Because the air is sealed inside the bottle, the amount of air does not change.
As the hot air cools, it takes up less space. When this happens the weight of the outside air is strong enough to crush the plastic bottle allowing us to see the power of air pressure.


Week 4: Atmospheric Pressure
Elevation effects air pressure and, as does temperature. Warmer temperatures result in low pressure air since the molecules spread apart. Cold temperatures result in air molecules packed closer together and higher pressure. Watch a short video on air pressure.
Barometers and Weather
Barometers are important devices in forecasting weather. Moisture is stored in low pressure air. Therefore, if the barometer is dropping it can mean a storm is coming. Often when weathermen speak of hurricanes, low pressure is discussed.
High pressure systems are commonly associated with nice days. The high pressure keeps the moisture out, but if a high pressure hangs over an area too long it can mean drought.
Since air likes to move from areas of high pressure towards areas of low pressure, barometers can help to predict wind.
Make Your Own Barometer
Since mercury changes its size so dramatically in accordance with pressure, it is the key element in many barometers. However, since it is toxic and difficult to obtain, construct a barometer from an empty glass jar, balloon, straw and tape.


Place the barometer near the wall and draw pressure lines onto a sheet of paper behind the barometer. Over time watch the indicator move up and down.
Week 5: Wind

Egg Cartons or Small Disposable Drinking Cups
Tape
Straws
Thumb Tacks (push pins) or Sewing Pins
Pencil with eraser
Craft Sticks
First tape the straws together at right angles.


Use a skewer, nail or scissors to make an initial hole.

Tape four egg carton/craft sticks onto the ends of straws ensuring that the cups all pointed in the same direction.

Use a thumb tack to poke a hole through the center of tape and straw and then place a pin through the hole and into the eraser of the pencil.


Meteorologists measure wind speed in miles/hour. Ask the older kids how the measurements from the anemometers could be converted into miles per hour and let them think about it overnight. This is an excellent brain workout in logical thinking.

To convert revolutions per minute to miles per hour the revolutions need to be changed into a distance of miles and the minutes need to be converted into hours. Measure the distance between two cups and multiply by 4 to find the distance traveled in one revolution. Then convert inches into miles. There are 63360 inches/mile.
Here's what the conversion calculation looks like using the formula for circumference.

This equation gives the results in miles/hour. (d is the diameter of the anemometer).
Week 6: Magnetic Field
The Earth's magnetic field is generated by the liquid iron continuously flowing in the core. Today our compass needles point north, but it hasn't always been that way. Scientific evidence found in pottery, Hawaiian volcanic lava flows and ancient lava flows suggest the Earth's magnetic field changes direction every 200,000 years or so. Being that it's been over 700,000 years since the last reversal, we are overdue for a flip.
The magnetic field protects us from the sun and from solar weather. Without it, solar weather would bombard our planet with radiation and strip away the atmosphere as it has done to Mars. On the positive side, the gorgeous northern lights are a visible reminder of the magnetic field. If the magnetic field does change directions during our lifetime, the northern lights would be visible all over the planet.
Since the interaction between the magnetic field and solar radiation is responsible for the northern lights, watch a few videos on how the northern lights are generated and legends associated with the Northern Lights or Aurora Borealis.
Playing with Magnets
After learning about the magnetic field, play with magnets.

Earth's Core and Magnetic Field in a Bottle


Make a Compass


If you enjoyed this unit study please consider purchasing the skip-counting game Speed! from me not Amazon, and signing-up to follow Highhill Education by email.
Delivered by FeedBurner
No comments:
Post a Comment
Note: Only a member of this blog may post a comment.