Introducing children to masterpieces of art is very enjoyable using story books containing recreations from the experts.
Katie is the main character in a series of books by James Mayhew. In most books Katie visits an art museum with her grandmother. When grandma stops for a rest Katie explores the museum by stepping inside the paintings. In Katie Meets The Impressionists
she finds herself on stage with Edgar Degas' Blue Dancers, meets Jean, Claude Monet's son and is chased by a swarm of bees in a Field of Poppies. This series is wonderful for children PreK through about sixth grade.
Come Look with Me: Enjoying Art with Children (Come Look with Me) (World of Art)
In this series of Art books for children, each page contains a new masterpiece with several questions designed to get children to look and think about the pictures. After reading and discussing the questions, there is a short paragraph with information on the artwork.
Cave Paintings to Picasso: The Inside Scoop on 50 Art Masterpieces is a favorite of mine. The book selects well known pieces of art and describes the people, works and circumstances surrounding their creation. Since we have completed in-depth history studies each of the past three years many of the works are familiar and this book both serves as an interesting review as it introduces new cultures.
* I did not receive any compensation
for this recommendation. I'm just a homeschooling mom who has found
many products that I like. If you're interested in the products I
recommend on this blog I want to make it easy for you to find them. ** I am an Amazon associate and
receive a small portion of the sales on orders made after clicking in
from this site, which I promptly spend on homeschooling books and
supplies for my children.
We followed a tutorial called Take a Line for a Walk from Art with Alex and the kids loved it! Great for ages 5 or so and up, all that's required for this project is a sheet of paper, black marker and oil pastels.
Art is good for fine motor skills and creativity, and sadly has been an area I have not given much attention. This is the first post in what I hope to be a much more common theme - Art Projects.
The first thing we did was watch Alex's short video.
Then we drew a continuous line from one corner of the page to another corner, with black marker, making sure not to cross any existing lines, and to fill in the entire paper.
Next, beginning at one corner we followed the design like a maze and colored on one side of the line.
The resulting pictures were very individualized, bright and beautiful.
The kids loved it and told me they want to do more art projects for school! They even repeated the project later in the day on their own. Yeah!
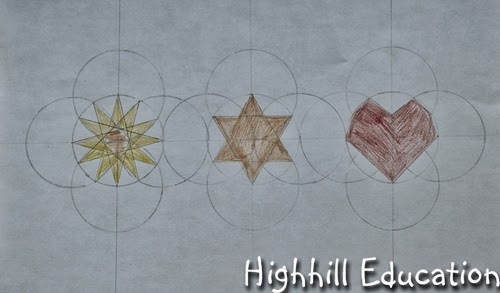
We created five circle grids and then found shapes in the circles.
This activity was very similar to the seven-circle grid shape finding activity we recently did and also based on Islamic Art and Geometric Design from the Metropolitan Museum of Art. All that was needed for this activity was a sheet of paper, straight edge and a compass. Colored pencils made it more fun to color when complete.
A vertical line and horizontal line running through the middle of the paper were the main elements required to construct the circles.
To construct a horizontal line through the center of the paper, the
compass point was placed on the corner of the paper, set at a radius
greater than 1/2 the width of the paper (around 6 inches), and used to sketch an arc
near the mid-line of the paper. Repeating the procedure using the other
three corners of the paper resulted in two arced x's which were
connected with a straight line as shown in the image above.
A perpendicular line through the center of the first line was constructed by placing the point of the compass at the center of each X and drawing additional arc lines above and below the line and connecting them as shown in the image above.
At this stage the paper had one vertical and one horizontal line. The horizontal and vertical center could have been found much easier by folding the paper in half, but learning to use the compass to bisect lines and create horizontal and vertical lines is a valuable skill used in the art of mechanical drawing. After the lines were created, the rest was easy.
The compass was set to a radius near one inch and a circle was constructed with the center at the intersection of the two lines. Four additional circles were constructed where the center circle crossed each line.
Looking at the center circle it was possible to create many different shapes by connecting points created where circles intersected with each other and straight lines. After finding a shape in the center circle, additional circles and two additional vertical lines were created.
The vertical lines were created by widening the radius of the compass to around 3 inches, placing the point at the point where the additional center circle and horizontal line met, and creating tick marks above and below the line to be connected with a straight-edge.
Some shapes found:
squares
triangles
pentagon
hexagon
six-pointed star
eight pointed star
twelve pointed star
heart
rectangles
Before proceeding to the next phase, creating patterns with five-circle grids, this activity was repeated several times over the course of a few weeks. It was exciting for both the kids and for me to discover the shapes in the circles.
Creating the grid was a valuable learning activity, but when repeating the project grid creation becomes a chore. Below is a grid I created. Please feel free to use it for personal or classroom use.
Week 3: We did three simple activities to learn more about our atmosphere.
There are layers above the Earth, just like there are inside it. Our atmosphere is comprised of five layers; troposphere, stratosphere, mesosphere, thermosphere and exosphere. Over the past 60 years scientists have done extensive studies on the various layers. In the 1950's Joseph Kittinger performed a series of high altitude jumps. Project Excelsior was an important precursor to space exploration. From 19 miles above the ground, in the stratosphere, he made his final successful jump.
Oxygen fills our atmosphere, but it hasn't always been that way. Over 2.5 billion years ago tiny cyanobacteria were the first known living organisms. They were able to convert the carbon dioxide in the atmosphere into oxygen. Today, oxygen is produced by green plants which contain an organ which was derived from cyanobacteria.
The National Geographic video Our Atmosphere did an excellent job explaining how our atmosphere works.
After watching the video, we did several activities to learn more about our atmosphere. How the Earth Works (How It Works) is packed with experiments and ideas to accompany an Earth Science Study. It is only one of the numerous resources we are using.
The first activity was so quick and simple, yet lots of fun. The kids laid on the floor and were covered with the five atmospheric layers. As more blankets were added they could feel the weight of the atmosphere upon them.
Activity 2: Air Expands as it Rises Materials
glass
straw
cooking oil
As air rises it expands because, the pressure decreases. There is less atmosphere or weight on top of it. To show that air expands as it rises, an air bubble was blown into a glass of cooking oil. As the bubble rose, it was possible to see it increase in size.
Activity 3: Air Pressure Materials
Hot Water/Steam
Cold Water/Ice
Empty Water Bottle
Even though air cannot be seen it is a powerful force. Our bodies are uniquely designed to withstand the pressure. To visually see the power of air pressure, hot air was cooled inside a plastic bottle. Because the air was sealed inside the bottle, the amount of air could not change.
As the hot air cooled, it took up less space. When this happened the weight of the outside air was strong enough to crush the plastic bottle allowing us to see the power of air pressure.
First, a small amount of water was boiled on the stove.
Next, the water bottle was filled about 1/4 inch deep with water and the quickly sealed by putting on the lid to trap the hot air inside.
Meanwhile, a bowl was filled with ice cubes.
Finally, the bottle with hot air was placed into the ice to cool the air inside the bottle. Incidentally, this process also resulted in rain inside the bottle. - Yeah - the water cycle!
Over the next 15 minutes or so the bottle was crushed by the weight of air in the atmosphere pushing in on it.
Be sure to come back next week when we make an anemometer (device to measure wind speed).
* I did not receive any compensation
for this recommendation. I'm just a homeschooling mom who has found
many products that I like. If you're interested in the products I
recommend on this blog I want to make it easy for you to find them. ** I am an Amazon associate and
receive a small portion of the sales on orders made after clicking in
from this site, which I promptly spend on homeschooling books and
supplies for my children.
Week 2 - We learned about what happened after the western half of the Roman Empire fell and built a model of the Hagia Sophia's dome.
After the western Roman Empire fell, Europe was in turmoil, but the eastern empire thrived for another 1000 years. Here is a very simple and brief overview of the time period between 500 AD and 1000 AD known as the Dark Ages in western Europe and the Byzantine Empire in eastern Europe and western Asia.
Because the Roman Empire grew to a great size and became difficult to defend, the empire was split in two. Rome was the capital of the west and Constantinople was the capital of the east.
The western Roman Empire ran out of money and couldn't pay the army, so the army invaded Rome. Soon after, the capital and lands were invaded by many other tribes such as the Goths, Visigoths and Vandals.
The turmoil lead to a complete breakdown in leadership and infrastructure. To survive, the people of the west formed small kingdoms. (Each circle represents a kingdom.) The kingdoms fought with each other.
In the east, Christianity was flourishing by force. The city of Constantinople was strengthened with walls and an extensive water system which included grand underground cisterns. The people had public baths, running water, public entertainment and lived in relative comfort.
While the Byzantine Empire continued to thrive, an Emperor named Charlemagne began to unite the lands of Northern Europe. He forced Christianity, repaired roads, and built schools. Although the country wasn't ready, the period when Charlemagne ruled was a mini-Renaissance.
Meanwhile, the Muslims were growing across Northern Africa. Eventually they crossed into Spain across the Straits of Gibraltar and restored the economy by introducing water management technology and new crops. They brought their religion and came to be known as the Moors.
When Charlemagne died, the empire he built crumbled. Not long after the Vikings attacked at many locations.
In Brittan they were confronted and expelled by Alfred the Great, but in
Northern France they managed to win land known today as Normandy.
William the Conqueror, a descendent of the Normandy Vikings, fought with Harold Goodwin in the Battle of Hastings in 1066 for the English crown.
While the people of Northern Europe were gathering together for the Crusades, the Moors in Spain were busy translating ancient texts from Arabic into Latin and sowing the seeds for the Renaissance.
To learn more about the Byzantine Empire, we watched the video Engineering an Empire - Byzantine.
The Byzantine Empire lasted 1000 years before it was eventually conquered by the Ottoman Turks. One of the first powerful emperors of the Byzantine Empire was Justinian. He was disliked by the people for his greed and brutality, but tried to make peace by building an incredible Christian Church.
The Hagia Sophia, located in Istanbul, was built in the year 537. With ground breaking technology, the Byzantines were able to create a huge interior space by building a dome, buttressed by semi-domes. After the Ottoman Turks conquered the city, the Hagia Sophia was converted into a mosque and was the main influence for constructing other mosques in the region. For that reason, the book Mosque by David Macaulay is an excellent book for obtaining a better idea of how the church was built.
Our Hagia Sophia dome was constructed from Legos.
We began with four arches,
and a dome.
After several collapses, the main supports were reconstructed from different blocks. Incidentally, the original dome of the Hagia Sophia also collapsed and had to be rebuilt.
The dome is supported on four arches.
The area in the corners between the arches is known as the pendentives. This technique of resting a dome on four arches and pendentives was developed by the Romans, but the Hagia Sophia is the first large scale building which uses the technique.
The dome was carefully put into place.
Sign-up to follow Highhill Education by email below.


_wm.JPG)


