Earth Science Unit Study
Week 15: We did three activities to explore how water moves underground.
Beneath the surface water flows down through the soil. In some places there are underground rivers, lakes and streams. Once water reaches the water table, it can even rise through the soil.
Following chapter 22 in
Janice VanCleave's A+ Projects in Earth Science: Winning Experiments for Science Fairs and Extra Credit
we explored how water percolates down through soil, how capillary action enables water to move up through the soil just above the water table, and how an aquifer or oasis forms even in very dry regions such as a desert.
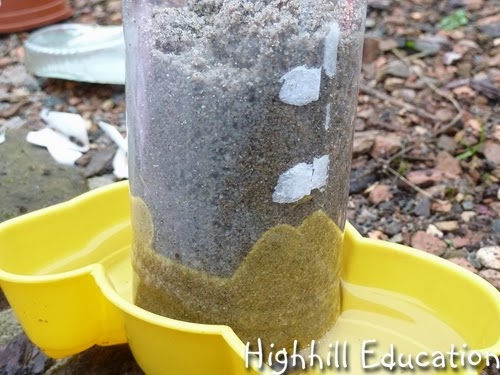
The Water Table
To see what water does as it seeps into soil we simply poured some water into a mixture of sand and gravel.
An impermeable layer is a layer of rock or clay beneath the surface which is so densely packed that water cannot penetrate. For this experiment the impermeable layer was the bottom of the jar.
Once the water reached the impermeable layer some of it began to rise back up through tiny air pockets.
Then it finally settled and a water table line was clearly visible. Above the line the spaces between the sand and gravel were filled with air, and below, the spaces were filled with water.
Rising Water - Capillary Action
Because there is a molecular attraction between liquids and solids, liquids can defy gravity and rise into small spaces. Seeing colors run up through coffee filter paper dipped in water, water rising into a paintbrush, and surface tension are other examples of this phenomenon.
To see how capillary action is related to Earth science, a plastic cup filled with sand and containing holes in the bottom was placed into a dish of water.
After a few minutes the water could be seen rising above the level in the dish.
A Desert Oasis
It's so strange the way an oasis can pop up in the middle of a dry desert. Water is trapped beneath the surface in many locations throughout the desert. With an impermeable layer both above and below it cannot get out unless it finds a crack.
To create an oasis in a bowl, the bowl was first lined with clay. The clay served as the impermeable layer under the water.
Next a permeable layer of sand was placed on top of the clay.
Then more clay was added on top of the sand for the upper impermeable layer.
All three layers were pressed into a bowl shape. Then a hole was placed in the clay so that the water had a crack to escape from the impermeable layer. It was important for access to the permeable layer to be left open in order for the water to have a place to enter.
Unfortunately adjustments were necessary before the experiment would work properly. The clay we used was not as impermeable as suspected, so it soaked up water rather than serving as a barrier in which to trap the water.
To solve this problem a straw containing a hole in the middle was slipped into the permeable sand layer. The straw was impermeable both on the top and bottom and worked much better to trap the water. When water was added to this layer near the end of the straw, it was able to escape at the center hole forming an oasis.
If I had this to do over again, I may have used plastic wrap below and above the sand layer to ensure it was impermeable or perhaps used some craft foam to serve as the impermeable layers.
If you liked this post, please sign-up to follow Highhill Education to receive the upcoming Earth science posts.


No comments:
Post a Comment
Note: Only a member of this blog may post a comment.