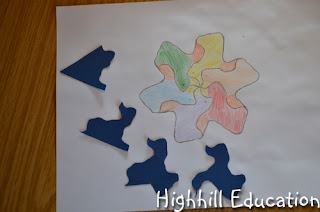
Tessellation is the process of translating or rotating shapes so that they fit together perfectly. Any shapes that can be laid side-by-side without any space in between can be tessellated. This includes equilateral triangles, rectangles, squares and hexagons among others. Circles don't work because when they are placed side-by-side there are gaps between.
Beginning with an equilateral triangle, we fancied up the edges using a procedure that would allow our new shape to fit together. Tessellations are actually very mathematical. Learning about equilateral triangles, measuring angles, measuring edges, dividing, creating patterns, using rotation and translation, and symmetry are mathematical concepts covered through this creative artistic activity.
For art last year we looked at many different paintings in Come Look With Me: Exploring Landscape Art With Children (Come Look With Me Series). One of the paintings was by Escher, who made extensive use of tessellations. I never thought of trying the technique at home until I read Lucinda at Navigating by Joys' post about tessellations.
After a quick internet search I found this tutorial which clearly explained the technique.
Materials
Scissors
Cardboard, cardboard food container or card stock
Paper
Pencil
We began by creating an equilateral triangle.
Equilateral triangles have three sides the same length, and three 60 degree angles.
Then we replaced one edge with a new line.
The shape was cut out.
The new shape was traced onto the card stock paper.
Next, the creative edge was inverted onto an adjacent edge of the triangle. This was done by rotating the figure using one corner of creative edge's line of the triangle as a fixed point until the other corner of the creative edge's line matched up with other corner of the triangle. The creative edge was traced to replace the second straight edge of the triangle.
The new shape was cut out. In all, the shapes had to be cut out four times.
1. Triangle with 1 fancy edge
2. Triangle with initial fancy edge and inverted fancy edge transferred onto second edge.
The same procedure was used for the third edge, except the line was divided in half to create two parts. One half of the line was fancied and the line was inverted onto the other half of the edge.
3. Triangle with 2 fancy edges and one half of the third edge fancied up.
4. Final shape with the one-half fancied edge inverted onto the other half.
Once the final shape was created it was traced onto a blank piece of paper, then rotated and retraced fitting the edges together.
Then the designs were colored.
Here's the one I created. I saw an old man yelling in my tessellation.
My daughter thought her's looked like a duck.
My son saw a dinosaur eating in his.
Sign-up to follow Highhill Education by email below.


I saw the same video and is going to use it in the autumn for tessallation work. I love your clear instructions and the beautiful work that your children have produced. Making those intricate designs must have taken lots of concentration.
ReplyDeleteI was surprised by how quickly the rainy afternoon flew by while we were all engaged in this activity. There was another video I noted that explained translation tessellations with a square. I think we will try that one in a few weeks.
DeleteOoh I hadn't seen this - thanks, we're going to try it too! Love the way you've used your imaginations to describe your designs.
ReplyDeleteThank you. This activity was inspired by you!
DeleteThe tessellation designs look great! And love your clear instructions - this will be a great rainy afternoon activity to try out. Thanks!
ReplyDeleteMy boys will love to do this at home! Thanks for the great idea!
ReplyDeleteCathy
www.thecurriculumcorner.com
This is a very beautiful artwork indeed. I think we'll attempt simple tesselations when daughter is a little older.
ReplyDeleteFabulous tutorial and the results are amazing! Thanks for sharing this at the After School Linky Party. I'm featuring it tomorrow. Stop by to check it out and share more of your amazing ideas/activities!
ReplyDeleteGreat post! Love the pics!!!
ReplyDelete24/7 Teacher: Amy Harrod
I love, love this project (I am a little partial to math:). I love how after they put the project together, they had their own ideas about what picture they saw in the tessellation! Thanks so much for linking up. :)
ReplyDelete~Holly
Fourth Grade Flipper
Tessellations was one of my favorite math lessons when I used to teach!! Thanks for sharing at my Pin Me Linky Party!
ReplyDelete