People from many ancient cultures wore beaded headdresses and little girls love them. Here's a simple way to make your own.
Materials
Beads
Embroidery Floss
Needle
First cut a piece of embroidery floss around 3 feet long and thread the needle.
Slip 12 beads onto the floss and tie into a circle.
Slip 3 beads onto the floss then thread the floss back through the first two beads (purple).
Slide the floss through the next two beads in the circle.
Repeat until there is a circle with four sets of beads coming off the circle.
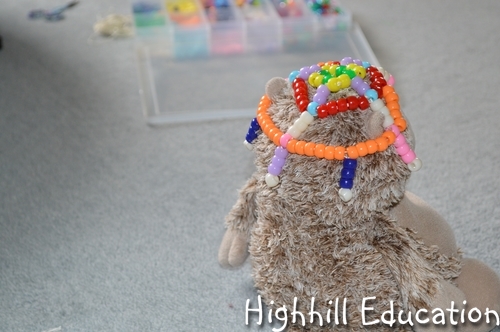
Stop when the floss comes out at the end of one of the legs as shown in the above picture.
Next slip 5 beads (red) onto the floss. Then thread the floss through the bead at the end of the next leg (blue).
Continue until beads are threaded between each leg.
Repeat the steps above to add four beads to each corner of the headdress.
Test the headdress for size.
Continue adding beads using the techniques above until the headdress is big enough.
To finish tie a knot with the remaining floss, then slip it through a few beads and tie another knot, then slip it through 3 or 4 more beads and cut it off.
Then make another one, or two or three.
 This post is linked to:
We Made That
Funky PolkaDot Giraffe
WFMW
Tots and Me
It's Playtime
Real Family Fun
Pin-Me Linky
Sun Scholars
Crayon Freckles
Family Fun Friday
123 Homeschool 4 Me
This post is linked to:
We Made That
Funky PolkaDot Giraffe
WFMW
Tots and Me
It's Playtime
Real Family Fun
Pin-Me Linky
Sun Scholars
Crayon Freckles
Family Fun Friday
123 Homeschool 4 Me


Great beading project! It's really original.
ReplyDeleteApart from the fact that your child is not black...she reminds me of the Masai tribes women with her bead work. Great work!
ReplyDelete