Showing posts with label Sewing. Show all posts

Free Motion Quilting with Kids

My daughter and I are learning free motion quilting. Free motion quilting is a technique used to hold quilts together. Once the top is pieced together and that top is sandwiched with a backing and batting layer free motion quilting can begin.


Free motion quilting is something like doodling, but instead of paper and pen, you use fabric and a sewing machine. We are very lucky to have access to a high quality sewing machine to learn this craft, but there are many cost effective machines equally capable of being used to create free motion designs. All that's required is for the machine to have the ability to lower the feed dogs.

Feed dogs are the pieces of metal below the needle that move when sewing to suck the fabric through the machine. When the feed dogs are lowered, the seamstress is in control of moving the fabric and can move it in any direction desired. 

My daughter has been sewing since she was about 4 years old. She loves it. All my kids were introduced to sewing at a young age, but only two out of the three pursued sewing.  Kids are just as capable as adults at mastering free motion quilting and they don't have to have much prior knowledge of sewing. They should be comfortable with a sewing machine, but not an expert. The first key is practice! and the second key is a great resource or teacher!


We love Angela Walters. She is a great internet teacher who began by learning to quilt, progressed to machine quilting for others and now is the author of several books, has created her own quilting rulers and has created an excellent series of video tutorials.

We highly recommend her Free Motion Challenge videos that begin with teaching basic stitches such as the meander and progress into waves and swirls.

We began learning to free motion quilt when finishing up our 2017-18 school year quilts.

You can see swirls stitched above the basket.

This is one of my daughter's first attempts at free motion quilting. She did this on a traditional sewing machine with the feed dogs lowered. You can see her meanders in the upper right hand corner, and her swirls in the lower left. Above in the middle she tried some work with the rulers.

Advanced Sewing and Color Theory for Middle Schoolers

My daughter implemented color theory to create a beautiful table runner.

Last week I described a few of my sewing educational goals for my daughter as well as her first project; a robe. Since she hopes to be a designer in the future, I thought a good skill to improve would be her knowledge and use of color. Therefore, one item on the list of acceptable school activities was learn about color theory and create a table runner implementing the newfound knowledge.

The first thing she did was read the book Color Play by Joen Wolfrom. This book is written for quilters and begins by explaining the color wheel, and how colors relate to the seasons. Tints are colors that contain white, shades are colors that contain black and tones are colors that contain gray. It goes on to explain analogous and complementary colors then describes color combinations that work well together, the reasons why they are appealing and many examples.

Once she was finished reading the book she used the quilting program within Bernina Embroidery Software 8 to design her table runner. What she did using this program could have been done using a paper and colored pencils. The point was for her to make a plan before beginning to sew.

 Once the plan was made she selected fabric and began cutting and piecing.


I love the way she used the complementary colors of yellow and lavender as well as many of their tints and shades to move around the table runner.

I think reading this color theory book will have a big impact on the clothes she creates this year, but we will have to wait and see.

Advanced Sewing with Middle Schoolers

My sixth grader is learning much about sewing techniques.

This year, the kids have had a lot of say over their education. Though they don't have complete autonomy, they can select from a list of acceptable topics/activities or suggest their own. My goals are for them to become independent learners excited about what they are studying. In addition, I want them to persevere through difficulties and explore a wide variety of material implementing and enhancing their current skills as well as reading, writing and math skills. I've written several posts describing my son's exploits with Xcode, and now I have to tell you about my daughter.

She loves SEWING and DESIGN and HANDS-ON projects, so it was no surprise to me when she decided to sew a robe, learn about color theory and then implement what she learned by creating a table runner, and refinish a small cabinet. Reading a book on Greek Mythology was not a complete surprise, but a welcome addition to her crafty endeavors.


Last year we spent one day per week sewing a very elaborate quilt. My mom, I and my daughter each created a similar quilt. The project involved a multitude of new sewing and machine embroidery techniques. We all learned a ton.

This year we want to continue learning to sew, but one goal of mine is to make sure my daughter is continually learning when in school. Therefore, if she wants to sew, I would like her to sew something new or incorporate a new technique. Since sewing day last year was all about the quilt, it makes sense that this year should be all about clothes.


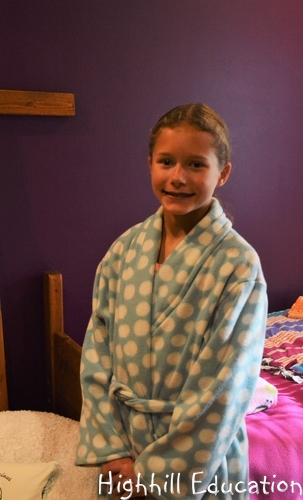
Her first project of the year was making a robe. Although she has created a few clothes items from patterns, reading patterns is a skill that she can definitely improve. To make the robe she selected the fabric, and worked with my mom to read the pattern. Most of the skills required to sew the robe were familiar to her, but she learned to match dots and marks within the pattern, put in sleeves and sew a square of stitching at the end of the belt rather than a straight line to hold the stitching in better.

Proud is my word for the year. I am proud of her and she is proud of herself. This was one great project for starting the year.

Learning to be a Designer

For over a year now my youngest child has stated she wants to be a designer. More specifically, she is referring to a clothes designer.


When she was five years old she met Denise DeMarchis, creator of the Matilda Jane clothing company. At the same time she met three other individuals connected to Matilda Jane. Shortly after that she began talking about becoming a designer, and for the last year she seems quite convinced that is what she would like to do.

My daughter is a creative child who loves art and would create and sew the entire day if possible. Because she wants to be a designer, at least for now, we are doing as much as possible to incorporate that into her education. For her computer work, she is learning how to draw using the free vector graphics program Inkscape. She watched a Netflix series on Art and Design and we are sewing again this year.

Sewing has been the highlight of her school week for two years now. My mom is a sewing fanatic and has been teaching my daughter and I everything she knows. Here is a glimpse of a few of the projects she has completed this year.

Snowman Potholder: This project involved sewing machine in-the-hoop applique and the chenille technique of fraying appliqued fabric, as well as incorporating heat protective layers into sewing projects.

 Christmas Tree Pillow: Paper piecing is a quilting technique for creating detailed designs with a pattern.

 Snowman and Christmas Tree Wall Hangings: These projects involved sewing with the blanket stitch, fusible wonder under for applique, applying rhinestones, and sewing on buttons with the sewing machine.

Flower Pillow: This pillow was sewing on the serger sewing machine and incorporated piping and unique fabric tucks.

Puffy Pillow: This pillow used texture magic, a heat sensitive product that puffs up when exposed to the heat from an iron. The iron actually never touches the material.


Batik Fabric Dying: These two pieces of fabric were created in a class to learn techniques of Batik Fabric creation. Wax was used as a resist and ironed off to remove from the fabric.

Design is a field that can go in many directions and there is an endless supply of machines and techniques to learn. Projects are varied and endless. Sewing day is not only the favorite day of the week for my youngest, but it is my favorite school day as well. I love learning and creating along with her.


Easy Felt or Fleece Flower

Following the directions in Fun-to-Wear Fabric Flowers, my daughter made a simple felt flower.

Each morning I read to my daughter. Usually we read a story or two and then directions for a simple sewing project. She knows when reading time is over she has free time and sewing is not a requirement. It's amazing how often she goes onto make whatever we just read about. :)

This simple flower project took her only a few hours to complete. First she cut a strip of orange felt approximately 4 inches by 22 inches long. The strip was folded in half and slits were cut into the folded side making sure not to cut all the way through to the other edge of the the strip.

Next, the slitted strip was coiled into a flower shape and a needle with thread was shoved through the base several different times to hold the flower in place.

 Perhaps she will use a hot glue gun to attach her flower to a barette, or make a second flower and attach them to a pair of shoes.


Looking for more activities to do with children? Be sure to check out the pages of this blog; Math, Language Arts, Science, History, Geography, Arts and Crafts and these other great Blog Hops.

Butterfly Applique

My daughter made two different butterfly applique t-shirts. One by hand and one using the sewing machine.

Applique is a fairly simple technique and can make a fun sewing project for children. Applique means sewing a pre-cut fabric shape such as a heart or a star, onto a background. My daughter sewed butterflies onto a t-shirt background.


 The key to applique is the iron-on paper that is placed between the fabrics to hold the design in place.

 First the paper is ironed onto the fabric to be cut out. Since the back side is paper, any design can be sketched onto the paper for cutting. Stencils tend to work really good as they are usually simple, yet recognizable shapes.

We used Pellon Wonder Under Fusible Transfer Web to create the design.


Her first butterfly project was sewn by hand. She stitched buttons and ribbon to a butterfly shape.


Then she stitched around the outside to hold the butterflies in place.

Her second project was done on the machine. The beginning steps were the same, but the machine was used to sew around the outside of the butterfly. Any basic machine can be used as long as it is set to a wide stitch with a short length. After the butterfly was in place, buttons were hand stitched for embellishment.


Looking for more activities to do with children? Be sure to check out the pages of this blog; Math, Language Arts, Science, History, Geography, Arts and Crafts and these other great Blog Hops.

Quilting with Kids

Actually a better title for this post may be watching kids quilt. I am raising two girls that love to quilt and I do not have a quilting hobby. When my 13 year old daughter was about 6 years old I helped her create a very simple quilt similar to the one my 8 year old just finished (pictured below).

Not being a quilter myself, but only knowing a few basic sewing techniques, I read a book and helped her finish the quilt. Unfortunately, I was not familiar with many of the time saving quilting secrets or the proper techniques, but I was familiar with my daughter's abilities, and apparently created a quilter.

That was seven years ago. Since then she has completed eight quilts and is working on her ninth. She loves quilting and can't get enough.

Soon she will be taking her first quilting class and she is saving her money to purchase an embroidery sewing machine.

In addition, her hobby has inspired my 8 year old daughter to quilt. So far she has completed one quilt which took her over a year to finish.

She is proud of her accomplishment.


Since her quilt took so long to complete, I am now helping her with a quilted bag. It is started, but now sitting. She moved onto knitted slippers, a knitted scarf and other projects, but I think she will return to the quilted bag. She's not as focused as my older daughter, but just as crafty. Raising quilters, doesn't require parents to be experts or even have a quilting hobby. It just takes a little exposure. If kids enjoy it, they will continue on their own. If they don't enjoy it, they will find something else they like to do.


Fleece Cat Hat

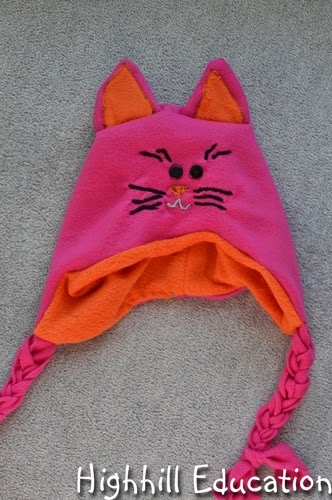
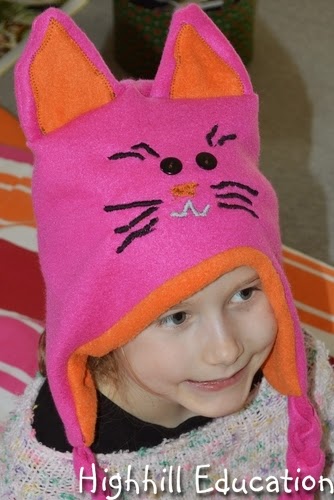
My 8 year old daughter sewed herself a fleece cat hat with a little assistance.

Sewing projects which can be completed in one or two days are great beginning projects for adults and kids alike. Using the pattern Simplicity Misses and Childs Hats Sewing Pattern 1953, Size A (S - L / S - L) a hat that looks like a cat was sewn.

This was the second time my kids created fleece hats. Since the first time was over a year ago my eight year old was able to do the majority of work on her own the second time.


Check out these great blogs full of educational activity ideas.

Fleece Animal Hats

We sewed animal hats from fleece fabric.

Sewing is a good skill to have but finding appropriate and interesting projects can be a challenge. These hats were simple enough for the kids to sew with only a little assistance, and great for learning since many steps were involved.

The Simplicity Misses and Childs Hats Sewing Pattern 1953, Size A (S - L / S - L) contains directions for creating five different animal hats. (frog, cat, monkey, owl and panda).

 First the patterns were cut. Next they were pinned to fleece and the fleece was cut.

Once all the pieces were available, the face was constructed and the hat was sewn into a circle. Pom-poms, braids, or tassels were created to hang from the hat.

The inner lining and outer hat were sewn together with the ears and tassels in place and then turned right-side out.

The hats were tested for size. The large version of the pattern was in fact very large. A small or medium would fit most people and a small is best for a child.

For more easy ideas to get kids started sewing, please see our Arts and Crafts Page.


* I did not receive any compensation for this recommendation. I'm just a homeschooling mom who has found many products that I like. If you're interested in the products I recommend on this blog I want to make it easy for you to find them. 
** I am an Amazon associate and receive a small portion of the sales on orders made after clicking in from this site, which I promptly spend on homeschooling books and supplies for my children.


Related Posts Plugin for WordPress, Blogger...