Showing posts with label Free Printables. Show all posts

Moors - Muslim Religion in Europe

Week 3: We made geometric designs similar to those found in mosques and Moorish structures.

Perhaps one of the greatest fabricated eras of modern history books covers the period when the Moors lived in Spain. Commonly left out of school texts, it's sad that this culture has been misunderstood and forgotten.

I first learned of the Moors during a trip to Spain followed by a trip to Gibraltar. The Moors entered Spain from Africa through the Straits of Gibraltar during a time when the area was in turmoil. The Roman Empire had fallen and the economy along with it. Along with their Muslim religion, the Moors brought water technology, new fruits and social structure which enabled the region to recover. Under Moorish rule, while the rest of Europe was in the dark ages, civilization in Spain thrived.

Paper had been invented long before by the Ancient Chinese, but the Europeans were still writing on parchment. The Moors brought paper technology into Europe. Before entering Spain, the Moors, which came from Turkey and areas further to the east had migrated across northern Africa. When they came across the library in Alexandria, Egypt they learned about the Ancient Greeks and Romans and began translating documents. The new knowledge allowed the Moors to continue the work of the Ancient Greek philosophers and scientists.

Their preservation of the ancient texts continued for almost one thousand years. Then, during the middle ages the information reached Europeans via Moorish Spain. In the Spanish city of Toledo ancient texts were translated from Arabic into Latin and Germanic languages the Europeans could understand. Scholars from Brittan, France and Germany traveled to Toledo to study the ancient information. In addition to the documents, perhaps the greatest innovation the Moors brought to Europe was their understanding of mathematics along with a complete set of new numerals.


When the Moors Ruled Europe is a documentary which provides a perspective on the Moorish occupation of Spain quite different than what is taught in most textbooks. I highly recommend adults and older children studying the middle ages make some time for this video. Although the majority of the video is suitable for much younger children, the length can put a strain on their attention spans.

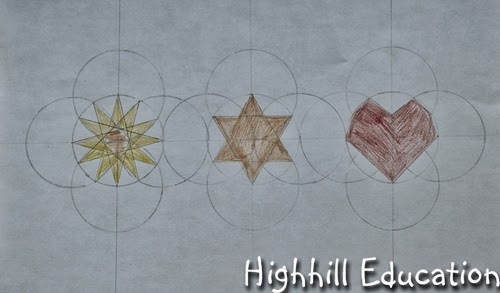
After learning about the Moors, we created Moorish geometric designs. Actually, several math art patterns were completed in preparation for this project.

Finding Shapes in Circles
Creating Geometric Designs in Seven Circle Grids
Finding Shapes in Five Circle Grids

All the project ideas were inspired by Islamic Art and Geometric Design from the Metropolitan Museum of Art.


Repeating the process for creating geometric designs using seven circle grids, new designs were created. The process was exactly the same. The only difference was that by repeating the exercise, we were able to see many more shapes and patterns in the grids resulting in more sophisticated designs.

My design was created by connecting specific points within the circles to create a continuous line rather than repeated individual shapes.


The pattern seen in my 12 year old daughter's design can be found many places in Muslim art. She was thrilled to find she created a Muslim design that had been used before.

 My son created five rows each containing a unique pattern.


Jemma colored the flowers in her seven circle grid. There is a distinct pattern in the center of the design where two red triangles in the center are followed by two purples on both sides, then greens and light blues.

She created another pattern using large triangles.

Creating the grids was a valuable learning activity, but to repeat the project grid creation becomes a chore. So I created some basic grids. Please feel free to download them for personal or classroom use.

7 Circle Grid for Finding Shapes
7 Circle Grid
5 Circle Grid for Finding Shapes
5 Circle Grid


Please sign-up to follow Highhill Education by email as we journey through the middle ages.
Check out these great blogs full of educational activity ideas. 

Geometric Design - Shapes in Five Circle Grids

We created five circle grids and then found shapes in the circles.

This activity was very similar to the seven-circle grid shape finding activity we recently did and also based on Islamic Art and Geometric Design from the Metropolitan Museum of Art. All that was needed for this activity was a sheet of paper, straight edge and a compass. Colored pencils made it more fun to color when complete.

A vertical line and horizontal line running through the middle of the paper were the main elements required to construct the circles.

To construct a horizontal line through the center of the paper, the compass point was placed on the corner of the paper, set at a radius greater than 1/2 the width of the paper (around 6 inches), and used to sketch an arc near the mid-line of the paper. Repeating the procedure using the other three corners of the paper resulted in two arced x's which were connected with a straight line as shown in the image above.

A perpendicular line through the center of the first line was constructed by placing the point of the compass at the center of each X and drawing additional arc lines above and below the line and connecting them as shown in the image above.

At this stage the paper had one vertical and one horizontal line. The horizontal and vertical center could have been found much easier by folding the paper in half, but learning to use the compass to bisect lines and create horizontal and vertical lines is a valuable skill used in the art of mechanical drawing. After the lines were created, the rest was easy.

The compass was set to a radius near one inch and a circle was constructed with the center at the intersection of the two lines. Four additional circles were constructed where the center circle crossed each line.

Looking at the center circle it was possible to create many different shapes by connecting points created where circles intersected with each other and straight lines. After finding a shape in the center circle, additional circles and two additional vertical lines were created.

The vertical lines were created by widening the radius of the compass to around 3 inches, placing the point at the point where the additional center circle and horizontal line met, and creating tick marks above and below the line to be connected with a straight-edge.

Some shapes found:
squares
triangles
pentagon
hexagon
six-pointed star
eight pointed star
twelve pointed star
heart
rectangles


Before proceeding to the next phase, creating patterns with five-circle grids, this activity was repeated several times over the course of a few weeks. It was exciting for both the kids and for me to discover the shapes in the circles.

Creating the grid was a valuable learning activity, but when repeating the project grid creation becomes a chore. Below is a grid I created. Please feel free to use it for personal or classroom use.

5 Circle Grid for Finding Shapes


Many more hands-on math activities are on our Math Page.

Sign-up to follow Highhill Education by email below.
Enter your email address:


Delivered by FeedBurner
This post is linked to:
We Made That
Classroom Freebies
Relentlessly Fun
Montessori Monday

Geometric Design - Seven Circle Grid Patterns

Building on the seven circle shape discovery activity, we used a compass to create a seven circle grid and then used the grid to create geometric designs.

Both activities were based from the Islamic Art and Geometric Design from the Metropolitan Museum of Art.


This time instead of drawing seven circles and looking for shapes in the center circle we covered our papers with overlapping circles.

Next a ruler was used to create a shape in one of the circles. Then the shape was repeated in adjacent circles. After the first set of circles were filled with shapes, more shapes were created in the spaces left blank between the circles. The new shapes were repeated in the same pattern.

After the initial shapes were created, the designs were colored with colored pencils.


This activity can be very addictive. In the course of completing a design, other designs and possibilities become apparent begging for a turn to be colored. Everyone enjoyed it very much.


Here is a basic 7 circle grid. Please feel free to download it for personal or classroom use.
7 Circle Grid


Here are links to a few of our past Math Art posts.
Tessellations
Math Art - Geometry
Math Art for First Graders


This post is linked to: 
Teaching Blog Addict

Probability Lessons and Activities for Kids

Probability can be an exciting math topic to cover and it can come in handy when playing games. I wanted to create a fun probability lesson for kids and got a bit carried away. It turned into a unit. The packet is 22 pages long and includes material to facilitate understanding as well as activities. 
The topics cover coins, dice, and random selections and are best covered in a total of eight sessions. Kids who understand fractions will get the most out of this unit, but even very young kids will enjoy the simple activities.

There are two versions of the packet; one with answers and one without. The answers are in red text. Please feel free to print this probability unit out for personal or classroom use, and don’t forget to have fun learning about probability.


This post is linked to: 
Montessori Monday
Classroom Freebies
Teaching Blog Addict

Rome Unit Study - Roman Numeral Bingo

Week 6: We played Roman Numeral Bingo.

Roman numerals are still used sometimes. Clocks and dates are common places to find them. Knowing how to read them makes it more fun to discover Roman Numerals.
Before playing Roman Numeral Bingo we talked about the ancient city of Pompeii. The kids read the books Pompeii...Buried Alive! (Step into Reading) , Vacation Under the Volcano (Magic Tree House, No. 13) and The Buried City of Pompeii: Picturebook and watched the video How The Earth Was Made..... Vesuvius.


The main focus of the video was the science of Vesuvius. Today the lava chamber under the volcano far exceeds its footprint and it is still active. When it erupts, it will not be a good day for the city of Naples. It obviously shows the horror of the day so I would recommending previewing this video before showing it to children.

Then we played Roman Numeral Bingo. Please feel free to print the game for personal or classroom use.

First we went over a few basics of Roman Numerals.
I=1          V=5
X=10       L=50
C=100     D=500
M=1000


Roman Numerals are built with place value. Numbers 1-8 are built with the letters I and V. Tens values of 1-8 (10, 20, 30,....80) are built with the X and L. Hundreds values of 1-8 (100, 200, 300,...800) are built with the C and D. Thousands values are built with the M.

Nines are made from the letters in the first column; I, X, C and M. IX=9, XC=90, CM=900.

Looking at the letters that make up the place value digit, a smaller letter value preceding a larger letter value means subtract. For example; XL = 50-10 = 40. A larger letter value followed by a smaller letter value means add. For example; DCC=500+100+100 = 700.

The word ROMAN is printed across the top of the Bingo board.
The R column contains the values 1-9.
The O column contains the values 10-99.
The M column contains the values 100-999.
The A column contains the values 1000-4000.
The N column contains all numbers.

Reading the winning numbers back was an added challenge.


* I did not receive any compensation for this recommendation. I'm just a homeschooling mom who has found many products that I like. If you're interested in the products I recommend on this blog I want to make it easy for you to find them. 
 ** I am an Amazon associate and receive a small portion of the sales on orders made after clicking in from this site, which I promptly spend on homeschooling books and supplies for my children.

Kid Calendar Project

We made calendars for the new year.

In Happy New Year, Pooh! (My very first Winnie the Pooh) and his friends are in a panic because there are no more days on the calendar and they don't know what will happen. This book is a cute way for kids to learn about New Year's, but also good for learning about the months in the year.

My daughter and I made a calendar together. I printed out a blank calendar and she first filled in the numbers for each month and then colored appropriate pictures. This was great math practice to review the numbers from 1-31. She learned how many days are in each month, and days in a week. Marking holidays and special events gave her something to look forward to throughout the year. Coloring the pictures helped to identify the seasons and holidays in each month.

Although this would seem like a great New Year's Project I like beginning it in September. December is just so busy with Christmas activities. Plus, this project can take several weeks to complete. Twelve pages of calendar plus twelve pictures is a lot. I have done this project with all three of my kids and each of them has felt so proud when finished and followed their calendar throughout the year.


This post is linked to:
Love 2 Learn
We Made That
True Aim Education
Relentlessly Fun

* I did not receive any compensation for this recommendation. I'm just a homeschooling mom who has found many products that I like. If you're interested in the products I recommend on this blog I want to make it easy for you to find them. 
** I am an Amazon associate and receive a small portion of the sales on orders made after clicking in from this site, which I promptly spend on homeschooling books and supplies for my children.

Multiplication Circles

I love multiplication circles because they can really help right brained creative kids understand multiplication. Plus, they are interesting for kids who already have a good handle on multiplication.

Completing one of the circles is a bit like doing a dot-to-dot using the ones digit of a multiplication table multiplier. Ok, so that was a bit confusing, so let me try an example.

For example, the numbers in the four times table are 0, 4, 8, 12, 16, 20, 24, 28, 32, 36 and 40. If you look only at the ones digit you should notice a repeating pattern of 0,4,8,2,6. Those are the numbers to use for the circle dot-to-dot. Try the other numbers to see some more interesting designs.
My eleven year old who was way beyond multiplication loved this activity. Malke at The Map is Not the Territory used a variation of this concept to create Christmas Ornaments. Check it out.

Click here for the free printable.
Free Multiplication Circle Printable

Please visit our math page to see more creative math activities.


Learning Through Stamps

We received free stamps from the Postal History Foundation and used them to learn by creating a beautiful scrapbook stamp album.

The Postal History Foundation offers stamp packets for educators - (home school, private school, public school and other educators). On the website there are spaces to indicate how the stamps will be used and how many students are involved. The stamps are free, but they accept donations and appreciate money for shipping expenses. After reading about this awesome free resource on The Traveling Sisterhood I immediately requested some stamps for my children.

Since my daughter loves myths and legends I requested a packet of Mythology stamps. I thought the Aqua duct packet would go well with our Ancient Roman studies and I requested plants and leaves because my son is currently very interested in plants.

My daughter already has a stamp collection of her own and an inherited one. In the past she spent a great deal of time sorting them by country and then pasting them on appropriate pages in a great big book. For American stamps she sorted them by date and placed them in a different album.

Although this provided many hours of amusement, she soon grew tired of the activity. With an infinite number of stamps available this task was never complete. It was easy to identify which country some stamps came from, but not so for others. By mounting stamps on a country page their beauty could be appreciated, but often, little was known about what was on the stamps. Needless to say, she lost interest and the stamps sat untouched for a year.

When we received the new packets of stamps I suggested a new way to organize them which was more like scrapbooking. I suggested she select a few stamps (2-10) that she was interested in and focus on them. By looking up information the stamps would have more meaning. She loved the idea and spent the entire weekend working on her stamp collection and has more work planned.

I'm so excited that she liked this idea and hope her interest continues. Researching, writing, history, art, reading, science and music (for particular stamps) are all covered. She can spend her summer educating me and herself.

Here's a close-up of the aqua duct stamps. She wrote:

"This aqua duct was originally constructed as a wall in the Byzantine Empire from 1530-1536. In later periods until 1911 it brought water to the city."

"This aqua duct was constructed to bring water to a city named Akko (sometimes called Acreu). Akko is located in Israel orn the coast of the Mediterranean."


"Mr. Johan Sebastian Bach came from a very musical family. Over 70 of his relatives made their livings as musicians. He was a German composer and during his life he made extra money by repairing organs. One time he worked for a prince until he felt the prince was getting too bossy and decided to leave. When the prince found his plans out, he had Bach thrown into jail until he finally let him go. Bach died in 1750."


Related Posts Plugin for WordPress, Blogger...