Showing posts with label Bridges. Show all posts

Bridge Unit Study - Lesson 8: Maintenance

Our bridge unit study ended with a discussion on maintenance.

Too often the cost of maintenance is not considered as part of the cost of a project. Whether you are building your home, a building or a bridge, maintenance should be a huge consideration. After all, if the structure breaks down, we will have to do without or start over from scratch.

Therefore, I was pleased that the book we chose to follow for our bridge unit study Bridges: Amazing Structures to Design Build and Test addressed the issue of maintenance. Painting, erosion, weather, corrosion, and traffic load are a few issues that determine how long the structure will last. The book does a good job of summarizing maintenance considerations.


To gain a better understanding of weather effects, my son explored corrosion with a science experiment. Putting steel wool into different types of water, he watched it over a 24 hour period to see how much it rusted. It was a very simple experiment and a great way to wrap up our bridge unit study.

Now where ever we go we take a good look at the different bridges around us.

 Honfleur Cable Stay Bridge (Normandie, France)

 London Bridge

Tower Bridge

Charles Bridge, Prague

Bridge Unit Study - Lesson 7: Bridge Design

My son designed several bridges.


What type of bridge would you build across a busy shipping waterway? How about over a deep ravine?


The book Bridges: Amazing Structures to Design Build and Test discussed advantages and disadvantages of many types of bridges including beam, arch, suspension, cantilever, draw, and hanging. It also addressed how the loads are carried, options for materials and brief changes throughout history.


What I really liked was the challenges the author posed to readers. Several times, kids were given a set of requirements and asked to design a bridge to meet those requirements. Each time my son was eager to design a bridge. Well he is far from an expert bridge designer, these questions enabled him to think about what he would do.


Bridge Unit Study - Lesson 6: Hanging Bridge Model

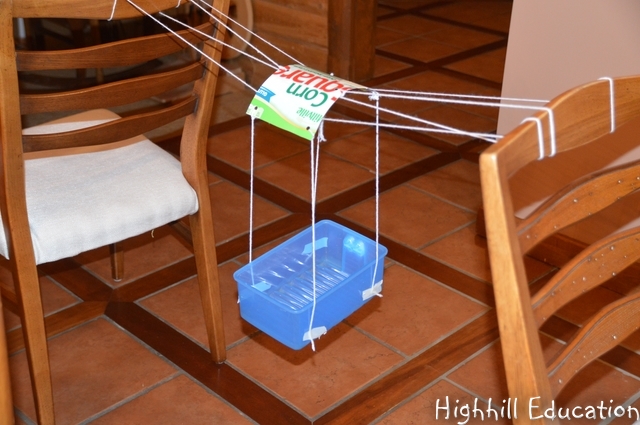
My son built a hanging bridge.

Although hanging bridges are rarely used today for transportation, they can make wonderful play structures. The one shown below is at a high ropes course. The hanging bridge is mounted on a pulley to a cable. The bridge is controlled with the rope to pull it near, and by gravity when traveling to the other end.

A similar bridge can be constructed over a calm waterway by attaching a floating raft to a cable spanning the waterway.


The book Bridges: Amazing Structures to Design Build and Test was the inspiration for this activity as it has been for most of our other bridge modeling projects.


This time, two straws were attached to a piece of cardboard to run on the main cables of the bridge.

Again, my son used two chairs as the main supports for his bridge.


A basket was hung from the cardboard pulley system to transport traffic across the bridge.

Please visit each of the pages on Highhill Education for more hands-on activity ideas. Math, Science, History

Bridge Unit Study - Lesson 5: Suspension Bridge Model

My son made a model of a suspension bridge.

Throughout history humans have built three main types of bridges: beam, arch and suspension.


The book Bridges: Amazing Structures to Design Build and Test explains each type in detail including how the loads are carried, steps in design, installation issues to consider, well-known examples of each type and suggestions for hands-on activities. After reading the section on suspension bridges, we watched the video Bridges of New York.


With the East River and Hudson River surrounding the island of Manhattan, New York City is full of bridges. This video details unique aspects of many of the New York bridges as well as the people who designed and built them.

After learning about suspension bridges, my son built a model.

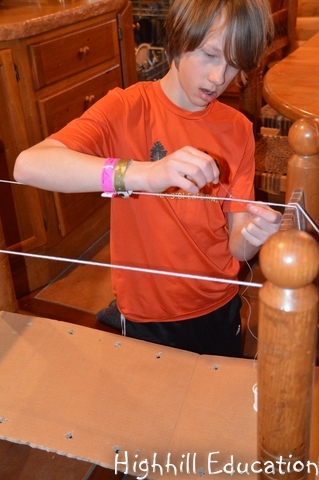
First he secured to main lines raised on chair back supports to two books serving as anchors.

Then he placed a cardboard road deck on top of the books with a heavier book on top of each end to hold it in place.

 Next he added thread lines connecting them from the deck to the main support cables.

Voila! What a cool project. I highly recommend this book The book Bridges: Amazing Structures to Design Build and Test.

Bridge Unit Study - Lesson 4: Cofferdam Model

My son built a cofferdam.

Have you ever wondered how construction engineers build structures underwater? Well they don't. They remove the water from the area they want to build with a structure called a cofferdam or a caisson. One method of building a cofferdam is to drive large metal structures into the soil in rings.  Then the water inside the ring is pumped out so the construction can be completed.

Cofferdams were used as many as 2000 years ago by the Romans who developed a unique type of concrete. Roman concrete incorporated ash material from nearby Mt. Vesuvius which made it very similar to modern concrete, but most importantly, the ash made the concrete waterproof. Since the Romans weren't building with steel, their cofferdams were constructed by driving two rings of wooden posts into the soil. The space between the rings was then filled with a watertight material such as clay to prevent water coming into the inner ring. They also did not have pumps, so the water was removed with buckets. Nonetheless, this method for removing water from an area allowed them to build support structures for bridges in the water.

While learning about cofferdams, we watches the video Engineering an Empire Rome as it was a very educational video which linked our bridge study to history.


The book Bridges: Amazing Structures to Design Build and Test is a fantastic resource for learning everything about bridges. It has been the foundation for our bridge study, and is packed with both information as well as activity ideas to help solidify concepts.


My son followed the instructions in the book for building his cofferdam. First he put sand into the bottom of a bowl and added water covering the sand. Next he put craft sticks into the sand in the water in a ring. The Romans would have used tree trunks for this step.


Then he put tape around the craft sticks to hold them in a circle and added a second ring of craft sticks.

The Romans filled the gap between the rings with waterproof material such as clay. Plastic wrap worked well for my son.

Finally, he used a turkey baster to remove the water from inside the cofferdam.

Please visit our Science Page for more interesting hands-on learning ideas.

Bridge Unit Study - Lesson 3: Trusses

My son built and tested a truss bridge.

Trusses are formed when two straight pieces come together to form a rigid joint. Most often they are triangular in shape and trusses are used in all types of construction from roof tops, to the Eiffel Tower and of course bridges.  

The book Bridges: Amazing Structures to Design, Build & Test (Kaleidoscope Kids), explained how trusses work and then suggested a project for building a truss bridge. Again, my son jumped in.

 Using craft sticks and glue my sun built a truss bridge full of triangles.


 It took several days to build the bridge as he needed to wait for the glue to dry after each new side was constructed.

 Once it was finished and dry, testing began.

 His plan was to attach a road to the bridge (a ruler) and hang a bucket full of weights from the road.

 The basic idea worked well, but the bridge turned out to be much stronger than he anticipated.

In order to test the bridge to the point of failure, a stronger road surface was required as it was the weakest link in the design.

 Throughout the process, he took notes which included a sketch of his design as well as estimates of how much weight the bridge could hold.


Test set-up

Weighing coins to determine how much weight was applied to the bridge


A stronger ruler (road surface) was used

Free weights were used instead of coins as they were heavier

Books, weights, soup cans......... lots of heavy stuff - the bridge still held strong

Finally he got a hold of heavier weights.

 The bridge reached failure. 


For more educational ideas visit these blog hops.

Bridge Unit Study - Lesson 2: Draw Bridge

My son built a draw bridge model.

Do you think a draw bridge is a beam bridge, arch bridge or suspension bridge?

Well drawbridges are a type of movable beam bridge. They were used extensively during the middle ages to prevent entry into fortifications. Before cannons were invented, residents could simply pull up the bridge, and it was very difficult for invaders to enter.

Here is a medieval draw bridge turned permanent bridge from William the Conquerer's castle in Normandie, France.

Draw bridges are also used today, but they are not quite so common. In my town, there is a drawbridge that raises to allow boats with tall masts to pass underneath and enter the channel. Most of the time it stays down, but during the summer months it often goes up and can cause some minor traffic back-ups.

After reading about draw bridges in the book Bridges: Amazing Structures to Design, Build & Test (Kaleidoscope Kids), my son followed the directions to create his own using an empty cereal box, string, and a straw.


 It's a pretty simple design. Just punch four holes in the box and lace the string through. Put the string through the straw and cut the string to the desired length for opening and closing.


Looking for more activities to do with children? Be sure to check out the pages of this blog; Math, Language Arts, Science, History, Geography, Arts and Crafts and these other great Blog Hops.
Related Posts Plugin for WordPress, Blogger...