
Week 1: Make Star Wheels and Locate Constellations
Did you know that the light from some of the stars we see is millions of years old and the stars don't even exist any more? Here are some vocabulary words/concepts to look up.
- Brightness Ratings of Stars
- Right Ascension and Declination
- Latitude and Longitude of the sky
- Speed of Light
A star wheel is a map of the sky which can be rotated to match the season and time of night. Print and assemble Uncle Al's Sky Wheels using paper, file folders, glue and a push pin.
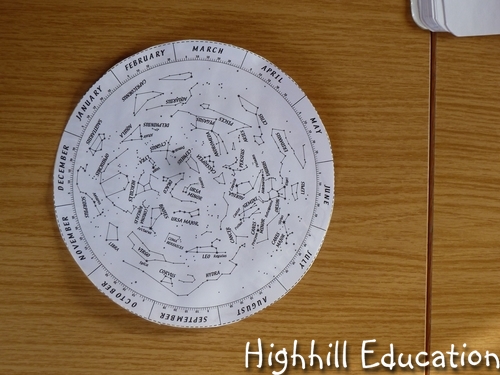
First glue the circle onto a file folder and cut it out.

Next glue the second paper to the outside of another file folder as shown in the photo below.

Then attach the wheel with a brad to the inside of the back of the file folder. Place the wheel such that the two circles have the same center point which is the North Star or Polaris on the map.
Bring the sky wheel and a red light outside at night and see how many constellations you can locate.
Here are a few books to go with this lesson.
Little Bear, You're a Star!: A Greek Myth About the ConstellationsFlight of the Last Dragon
Week 2: Track the Big Dipper
Celestial Navigation is a technique used by pilots, ship captains and other navigators to determine their location on the earth using the horizon, sun, moon, stars and/or other celestial bodies.Carry On, Mr. Bowditch
Track the Big Dipper
This activity can be done with any constellation at anytime of year. However the winter months of January and February are the best ones for several reasons. First of all, it gets dark much earlier, so kids don't have to stay up so late at night. Secondly, it's much easier to see that the big dipper follows the same path as the sun as it moves east to west in the winter. The big dipper is a great constellation to track because it is easy to find and is close to Polaris so is visible all year round.Stay up a long portion of the night or set an alarm numerous times during the night to complete this activity. You will be creating a drawing which shows the sky as it would be seen from laying on the ground. The center point is Polaris or the North Star. The drawing will show the Big Dipper at four times throughout the night, every 2-3 hours.

In the drawing above the lowest big dipper was sketched as was seen at 9:00. The green big dipper was the location it was seen at 11:00. The red dipper was drawn at 1:00 and the second purple dipper was drawn at 2:00. Depending on the time of year and location on Earth, your drawing will look a little different.
Draw a circle. Think of the circle sort of like a clock which shows 24 hours. Since it is only dark about one half of the night the one half of the clock will be blank. Draw an oval to show the portion of the sky visible at 9:00 and talk about the location of the sun. Draw the Big Dipper on your sky map. Wait a few hours and draw the Big Dipper in its new location. Repeat at least two more times throughout the night.
When you have completed the activity write down your observations. Compare them with the observations listed below.
- Because of the Earth's rotation, the sun appears to travel from east to west in a circular orbit across the sky. The same is true of the big dipper, except that it is closer to the center axis or the North Star.
- The time of night can be approximated based on the location of the big dipper just as the time of day can be approximated based on the location of the sun.
- The big dipper and all the stars follow the same path as the sun does across the sky. Everything moves in a circular counter-clockwise rotation about the North Star.
- The big dipper moves from east to west during the months of February and March just as the sun does.
- In the summer the big dipper moves from west to east, but still rotates counter-clockwise.
- All the stars move in a circular counter-clockwise rotation. If the big dipper moves from east to west Cassiopeia moves from west to east because they are on opposite sides of Polaris.
- The big dipper is visible all year round. Some constellations appear and disappear during the course of the year.

Week 3: Moon Phases

Did you know the moon phases are opposite in the southern and northern hemispheres, and that the moon moves 3 cm farther away from the Earth each year? Ocean tides are controlled by the moons travels and Earth's spinning. The Earth rotates counterclockwise one revolution each day, while the moon rotates counterclockwise one revolution around the Earth every 29.5 days.
Since there are more than 29.5 days in one month sometimes there are two full moons in the same month. The second moon is a blue moon. The name blue actually has nothing to do with the color. Colored moons are caused by particles such as pollution, pollen, and volcanic ash in the atmosphere.
As the moon travels around the Earth the portion illuminated by the sun changes. Depending on where you are on the Earth, a crescent moon can look like a letter C, a backwards letter C, a happy or a sad face.
Moon Phase Video
Watch this video on the phases of the moon.
Moon Phase Activity
You will need a globe to do this activity. Write the names of the months on twelve pieces of paper and place them in a circle. Have one child hold a flashlight in the center and represent the sun. A second child can be the Earth and a third child can be the moon.

At the same time have the moon child walk one circle around the Earth child for each month.

Week 4: Make a Telescope
Stars come in many shapes, sizes, types and colors. The Betelgeuse star in the constellation Orion's shoulder is a Red Giant. Sirius, the brightest star in the night sky is actually two stars. They are part of the Canis Major constellation and white dwarf stars. Nebula, Average Star, Red Giant, Red Super Giant, White Dwarf, and Black Hole describe even more types of stars. Watch this three minute video summary on the types of stars.Nuclear fusion is the process that produces elements. Stars actually form the elements of which other space objects are made. Watch this video about nuclear fusion.
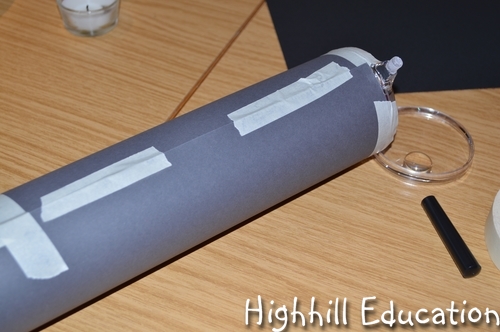
Make Your Own Telescope
Make a simple telescope and view the stars.Materials:
card stock paper
tape
magnifying glasses


Week 5: Comets, Meteors and Planetariums
A comet is basically a dirty snowball that sometimes contains gas. A meteor is a rock in space that is less than a meter in diameter. A meteorite is a meteor that has passed through our atmosphere and is right here with us. An asteroid is the same as a meteor, but bigger.


Week 6: Copernicus Models of the Solar System
It is natural for humans to view themselves as the center of the universe, and this philosophy was applied to the heavenly bodies during the lifetime of Nicolaus Copernicus. Copernicus was born in Poland during the Renaissance. Books were just beginning to be produced with the invention of the printing press, and Copernicus had access to several ancient science texts.Ptolemy, an Egyptian who lived nearly 1000 years before Copernicus, created a model of the universe with the Earth at the center. Ptolemy's model was accepted by most common people, scholars and the Catholic Church. Copernicus, studied Ptolemy's model and other ancient theories, before creating his model of the universe which placed the sun near the center.
Since it was a crime to speak out against the church, punishable by death, Copernicus decided to keep his model of the universe to himself. His ideas were finally published at the time of his death. Many of those who believed in his ideas were later condemned by the church, and it was not until the 19th century that Copernicus' work was removed from the banned book list.
The Story of Astronomy
Copernicus' Model of the Universe

Cut eight circles from card stock paper.


- - My Very Educated Mother Just Served Us Noodles - -
This silly phrase can help you remember the order of the planets beginning with the sun. Each letter in the phrase begins with the same letter as a planet. My=Mercury, Very=Venus, Educated=Earth, and so on.
Week 7: Rockets, Satellites and Space Vehicles
Read Man on the Moon (Picture Puffin Books). It tells the story of the first moon landing in a way children can easily understand, but manages to include some technical details.Buzz Aldrin is one of the three heroes in the book. Read his book Look to the Stars
Make a rocket, satellite or space vehicle using toilet paper tubes, egg cartons, tape, glue, rubber bands, aluminum foil, pipe cleaners and paint or a similar set of crafting supplies.


Redstone Rocket


Rocket on the launching pad

Mars Rover

A newly designed satellite

Another Satellite
Week 8: Universe and Galaxies
The universe was once so small it could be held in the hand, but it was the same weight it is today. Elements are created in the stars when particles crash together during nuclear fusion reactions. Amazingly, some university scientists have built a machine which can replicate parts of nuclear fusion. Watch the National Geographic video Birth of the Universe to learn more about our universe.
Since much of the matter in the universe is spinning and shaped like a spiral, find and discuss spirals in your environment.
_wm.JPG)
Snail Shells
Whirl Pools
River water flowing around obstacles
Horns of big horn sheep
Water flowing down the drain and toilet
Create a galaxy following this activity on The Art Club Blog.

You will need watercolor paper and paint.

Create a background with a spiral.

Splatter different colors of paint onto the paper.

Week 9: Star Life Cycles and Element Creation
In orbit since 1990, the Hubble Space Telescope has captured incredible images of the universe. Stars forming in nebula, the remains of a supernova explosion 1000 years after the fact, thousands of galaxies and a comet crashing into the planet Jupiter have all been seen in Hubble's images.
Scientists believe that the universe began as an extremely dense ball of matter which could be held in the hand. As it expanded it cooled and began spinning. Hydrogen and helium were the first elements to be created. As they swirled, atoms began to stick together forming clouds which became stars.
Watch National Geographic's video Hubble's Amazing Universe which explains how the universe works including how stars are born through the use of breathtaking images.
Element Creation
When a universe is created inside the stars, the heat and pressure increases causing elements lighter than iron to be created. The process of element creation inside the stars is much like the process of cooking.
In the stars Helium and Hydrogen are the ingredients that go in, heat and pressure are added, and elements lighter than iron are created.
In baking zucchini bread flour, milk, eggs, salt, baking powder and zucchini are the ingredients that go in, heat is added, and bread is created.
In both cases the new product looks much different than the initial ingredients.


Look for spirals!

Life Cycle of Stars
Make sure an adult is present when you do this activity as you will be burning a ball of newspaper and comparing it with the life cycle of a star.
Since paper probably won't explode, this project emulates the second life cycle.

Light the newspaper (star) on fire and watch the life cycle.

Average Star

Still an average star

Red Giant

Still a red giant

Outer layers peel away - planetary nebula

Still a planetary nebula

Becoming a white dwarf

White Dwarf

Sign-up to follow Highhill Education by email below.


No comments:
Post a Comment
Note: Only a member of this blog may post a comment.