Engineering involves using scientific principals to make useful things. This is a sixteen week, free engineering unit study where kids get to create useful things just like engineers. It is perfect for
kids in grades 3rd-5th and can be adapted to work for older or
younger children. The lessons are very hands-on and make reference to history and science. The references are designed to spark curiosity and can become a jumping off point for further study in many directions. If your child is curious about the historical references, I highly encourage you to take the opportunity and research further.
Week 1: Making Paper
The ancient Egyptians, people of Mesopotamia and Ancient Chinese all
made their own paper. Begin by creating a frame out of a cardboard box. It
will only last through one paper making process, so you will need another if you want to make more paper.
Place the frame on a piece of fabric. Pull the fabric tight and staple around the box lid.
Paper is typically made from trees, but can also be made from recycled paper. Rip pieces of scrap paper into small pieces and mix with hot water. Put the mixture into a blender or an old
juice container. Turn on the blender for a few seconds or shake the container. Let is sit for three hours shaking or turning on the blender every
30 minutes.
Pour the water-paper solution onto the frame to drain the
water. Flip it onto a sheet of wax paper. Put another
sheet of wax paper over top and use a rolling pin to squeeze out the
excess water.
Place the paper next to the heater and it should dry in a few hours. Write something special on your special home-made paper.
Week 2: Moving Pictures
Thomas Edison was an inventor and the first person to build a business by employing
inventors. One of the company's inventions was the moving picture. Today we call the moving picture a video. There are many great stories from the life of Thomas Edison. One
of my favorites is about how he pulled a duck off it's nest to try to
hatch the eggs himself. Read The Story of Inventions about several inventors which changed
the world. The phonograph was one of the first and most important
inventions of Thomas Edison. After reading about the phonograph watch this short video to see how it worked.
Watch this video biography on the life of Thomas
Edison.
Since we are living in the age of computers use the computer
to create a moving picture film. Using Paint create a series
of slightly different images. Then load the images into Live
Movie Maker and view them in quick succession to display movement.
After making a moving picture, experiment with creating videos using today's technology.
Week 3: Airplanes
Leonardo da Vinci was an artist, but also a great engineer. His
curiosity led him to study human organs, war machines, flight, music,
and the way people lived. Throughout his life he designed a high-rise
city, paddle boat, machine rollers for making thin sheets of tin, a
planetarium, scuba gear, tank, harpsichord-viola, and mechanical drum.
Improving the design of existing devices such as the cannon and catapult
also captured Leonardo's attention.
Of the numerous machines Leonardo da Vinci designed and improved, only a
small handful were ever built. Just like engineers of today, Leonardo
had difficulty securing funding and finishing a design to his personal
satisfaction.
He did however, improve the catapult by adding a counterweight and improving the throwing arm.
The cannon was improved by creating a large projectile which broke
apart upon firing releasing numerous smaller projectiles. Coupled with the redesigned projectile,
the power of steam was harnessed to fire the cannon and inflict maximum damage. The above models, Bombard Cannon Leonardo da Vinci Assemble Set, and Catapult - Leonardo Da Vinci Kit # EDU-61009 are purchased kits. In addition to the catapult and cannon, several other models are available.
Throughout his lifetime Leonardo kept engineering notebooks. They
contained his ideas and mechanical designs. Since parchment was
expensive, every possible inch of space was filled. Unlike a notebook of
today bound with a spiral ring, his notebooks were a collection of
loose pages held together with scarf-like pieces of fabric.
The horror of war frightened Leonardo and he worried about his lethal
weapon designs falling into the wrong hands. His style of mirror
writing, coupled with intentional mistakes built into his designs,
reduced the risk of his weapons being built by enemies. His notebooks
were some of the first examples of exploded view drawings commonly used
in engineering practices and instruction for kids building toys today.
Exploded views show parts of an assembly aligned with other parts, but
not in place. Drawing them exploded makes it easier to see how the parts
fit together.
Create a Leonardo Notebook Page on small pieces of paper.
1. Create engineering sketches for a custom designed machine. Be sure to include materials, and special instructions.
2. Write down anything you are wondering about.
3. Write down your weekly budget, grocery list and to-do list.
4. Write down anything else you are thinking about.
Try to write backwards like Leonardo if you want. Remember parchment was expensive, so Leonardo used all available space.
This one says, "I am hoping to make a machine that makes you never have
to eat. Here is a picture. I am saving up money for nothing right on my
hair is blond and my favorite color is yellow. Then comes red then
orange."
Your Height Diving Board
Leonardo da Vinci was obsessed with flight. Observing birds and
wondering how they flew was a favorite pastime. Purchasing caged birds
and setting them free gave Leonardo more opportunity for up-close
observation. His notebook pages contained designs for airplanes, gliders
and parachutes.
Fold a Nakamura Lock airplane and learn how to adjust it.
The four key adjustment elements of paper airplanes are symmetry, dihedral angle
of the wings, ailerons and elevators. Accurate folds and doing the same
thing to both sides of the plane are top priority. A non-symmetric
plane may turn, or fly upside down. Dihedral angle is the angle between
the wings and the body. A Y-shape is best. When the wings point down
instead of up, planes often fly upside down. Ailerons and elevators are
not separate features on paper airplanes, but refer to specific points
in the rear. Elevators are closest to the body and make the plane fly up
and down. Ailerons are farther away and make the plane fly left and
right. Bending the paper in the rear of the plane up or down a little
bit can result in flights which turn, rise up, or nose dive. John Collins, the Paper Airplane Guy has some great tips for adjusting planes. Watch some of his videos and then fold and adjust several paper airplanes.
Talk about different types of paper airplanes (gliders,
stunts, and darts) and factors which affect flight. Wing shape and
weight make a big difference. Planes with narrow wings tend to fly fast
and straight. They are known as darts. Wider wings result in longer,
slower flights of gliders. Stunt planes do flips. Adding weight to the
nose of a plane increases stability, but adding weight to the belly, can
make a plane sink to the ground. Experiment with adding weight using pennies,
paper clips, paper airplane design books, straws, pipe cleaners,
different types of paper and more.
Check for symmetry
Bring your paper airplanes to a park and set up challenges for your planes. Which planes fly best for which challenges?
Can you get a plane to stick into the fence? Darts are best suited for this challenge.
Can you get a plane to fly through the ropes? Can you get it to land on
the platform? Can you hit the cross beam with your plane?
Which plane flies the farthest, longest, highest, does the most loops? Planes are built with different purposes in mind.
Books
Read one of the following books to learn more about Leonardo da Vinci.
Leonardo's Horse
- This book details one project which consumed Leonardo during his
life. Unfortunately his larger than life horse was not built until the
20th century. Not only does this book provide a great historical
background on the project, it also gives engineering and manufacturing
details.
Leonardo Da Vinci
by Emily Hahn - Leonardo worked for some of the most prominent people
in Italy, had difficulty in finishing projects for them, and wasn't
always paid. This biography on Leonardo also provides insight into world
events and other important people of the Italian Renaissance.
Leonardo and the Flying Boy by Laurence Anholt is a Leonardo da Vinci picture book for young children which tells about some of Leonardo's flying machines.
Get paper, a hot glue gun, and tape then start assembling your paper gun.
Roll paper and use a hot glue gun to attach it together.
Adjustment the gun until it shoots.
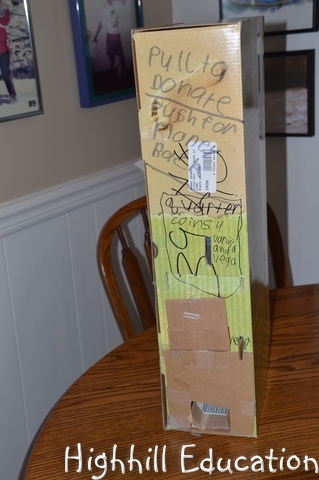
Week 5: Make a Vending Machine
Make a vending machine. There are no right or wrong answers, just
a million different ways to create a vending machine.
Using cardboard, tape, glue, string, straws, items from your recycle bin and other craft supplies
create a machine that will randomly return coins.
or
create a machine that will sort coins based on size.
or
create a machine that will return one item of the customer's choosing (vending machine).
Here is one example which is a sort of donation collection machine.
Directions for operation: Place bills into the wide slot. Place coins into the small slot. Place wads of cash into the money drain.
Coins can be retrieved through the special access panel at the bottom of the box.
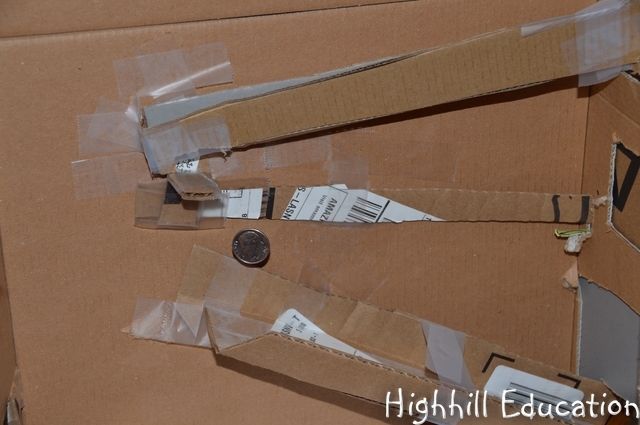
But here's the cool part. The inner workings. Inside the machine, there are levers and rails where money can be channeled out different slots
by pressing or pulling on certain levers on the exterior of the box. In
the photo above, the quarter rolls down the middle rail and out the
slot.
In this photo, a dime drops to the bottom rail and rolls out.
Create your own unique machine.
Week 6: Orange Peel Candles
Watch this video on making a candle from an orange.
You will need olive oil, an orange and a knife.
This candle is so cool! If the power goes out and there are no candles
to be found olive oil and an orange will do the trick. What a fun and
quick little project.
Week 7: Make your Own Circuit Board
Circuit boards are made up of layers, with small strips of metal
winding in maze patterns on each layer. In a real circuit board, each
layer would have several "mazes" connecting to various chips, or small
electronic devices. This is a simple project for kids to learn how one layer of a circuit board works.
Glue aluminum foil in a maze pattern onto a sheet of cardboard.
Put a light in the aluminum foil path. Then see if the light works after completing the circuit with wires connected to a battery.
Week 8: Make your own electrical switch
You will need three wires, batteries, a small light bulb and conductive and non-conductive supplies to make a switch.
Connect a wire to the batteries, to another wire, to the light, to another wire.
Create a switch using conductive materials where the conductor can be easily moved from an on or off position by having all the metal touch or be separated.
This is a switch made from quarters. When the wires touch the outside quarters the light is either on or off depending on whether or not the middle quarter is touching the other two quarters.
This is a switch made from a paperclip and two brads.
This switch is made from paperclips.
Week 9: Electrical Engineering
Snap Circuits are a
series of different kits designed to teach young children about
electronics. Electrical components such as resistors and capacitors are
mounted on large plastic pieces. The pieces are labeled with typical
electrical symbols and snap easily into place on a plastic knobbed
board.
By following the project ideas included in the book kids learn how
electricity can be changed into motion, light and sound. They learn how
current can be routed in parallel or series through circuits with
different results. These concepts are very advanced even for the
majority of adults, but become easier to understand through exposure.
Completing the projects in these kits provides that exposure in a fun
and motivating way.
If you are interested in Snap Circuits, the SC-100 or SC-300 kits
are the best places to start as they contain basic components. The
SC-300 is similar to the SC-100, but contains more parts and project
ideas. Upgrade kids are available. We own the SC-300 and the Sound kit. If you purchase a kit it will keep you busy for several weeks of an engineering unit study.
Week 10: Electrical Engineering
This is a perfect electronics kit to use when kids outgrow Snap Circuits or have an advanced understanding of electrical principals.
Elenco 300-in-One Electronic Project Lab
is an electronics kit designed for kids. Unlike Snap Circuits which
contains electrical components mounted to plastic pieces which easily
connect on a snap board, this kit contains actual electronic components
which connect on what engineers call a bread board.
A book full of explanations and project ideas is the key to getting
started. Kids begin by reading about the functions of electronic devices
such as resistors and capacitors. Next they learn to determine the
ratings of the devices by decoding the markings. Then the project fun
begins.
The first few projects include step-by-step instructions for connecting
all of the wires and devices as well as a schematic and wiring diagram.
Later projects include only the items true technicians have available.
In other words, the kids learn to read the schematics and wiring
diagrams and no longer need the step-by-step instructions to complete
the projects.
The first project is creating a chirping
bird sound.
Week 11: 3D, Math and Engineering Skills
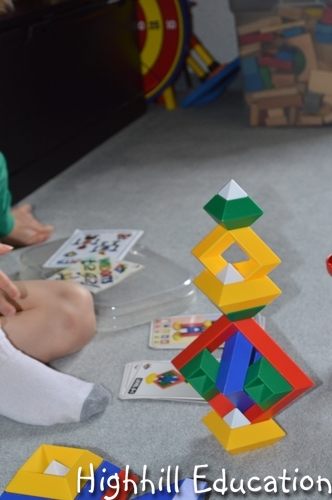
Imagability Wedgits and Design Cards challenge kids to follow designs to build interesting towers. Some designs are easier than others. Kids learn by working through the cards as the level of difficulty increases.
Wedgits are square shaped 3 dimensional pieces that fit together.
Using the cards as a guide is similar to following the instructions from
an engineering drawing to build a sub-assembly. There are four levels
of difficulty on the design cards. The level four cards are quite challenging even for adults.
There is a set of advanced cards available which is more difficult than the first four levels.
Week 12: Magna Tiles
Magna Tiles
are translucent plastic shapes that contain magnets around the edges and easily snap
together for quick and easy construction.
Magna Tiles can help children calculate and understand the concept of
surface area. They also provide good preparation for engineering
careers. Many parts used in industry are constructed from sheet metal.
The parts are commonly drawn as flat patterns with instructions on where
to fold them to create the finished 3-dimensional form. This can be
easily explained with Magna Tiles.
Here is a flat pattern for a cube, and the 3-dimensional form.
All three of these flat patterns fold into the same 3-dimensional form shown below.
If you don't plan to purchase Magna Tiles, you can still experiment with flat patterns and 3D shapes using paper cut out and then folded into 3-dimensions.
Build a castle with Magna Tiles.
Please note this toy is sold in 32 piece and 100 piece sets. The castle was created with the 100 piece set.
Week 13: Temple Models
Understanding scale is a very important skill. It has applicability in
mapping, model making and in creating engineering drawings. Select an Ancient Greek temple and build a scale model. The Temple of Hephaestus
is located in Athens, Greece. It is 104 feet long by 45 feet
wide and the height is estimated to be about 30 feet. The temple has columns
on all four sides. There are six Doric columns on the front and back,
and thirteen along each long edge.
One long block equals 10 feet in this model.
Count by 10's and round to determine how many blocks are needed for an accurate scale model. In this case 10 long
blocks and 1 short block down the long wall and 4 long blocks and 1
short block across the front and back are needed.
Scale model of the Temple of Hephaestus in Athens, Greece
Scale model of the Temple of Poseidon in Sounion, Greece
The Temple of Poseidon is very similar to the Temple of Hephaestus. They were both
constructed from marble and likely designed by the same person. Instead
of 34 columns, the Temple of Poseidon has 42. The Temple of Poseidon today stands in a
ruined state in Sounion, Greece. Sounion is located about 1.5 hours from
Athens on the legendary spot where Theseus's father Aegeus saw Theseus
returning from Crete with the black sail hoisted on his ship.
Week 14: Make Your Own Remote Control Car
Gears are a part of many engineered machines. Understanding how gears work can be learned by young children with hands-on toys and examples. The Thames & Kosmos Remote Control Machines
kit does just that. It comes with gears, small motors, a remote control, building
pieces and instructions for creating eight different remote control
vehicles. Gears
are one fundamental component in many mechanical devices, and the
literature that comes with the kit begins with hands-on activities that
teach the basics of gears.
When one gear makes another gear spin, the number of times the driver
gear goes around in a circle compared with the number of times the other
gear goes in a circle is called the gear ratio. The gear ratio is
related to the number of teeth on both gears. Since the gears in this
kit all have teeth which are multiples of 10 (10, 20, 30 and 40). Gear
ratios are easy to predict and calculate.
It is possible to place too many gears in contact with each other so that they will not spin and will be locked in position.
One of the tutorials in this kit instructs the gears to be assembled as shown
above. Then it asks the question "What is the gear ratio between the
yellow driver gear on the bottom to the yellow driver gear on the top.
I assembled this particular model and wouldn't let my son touch it
before giving me a prediction. The gears were locked in place.
The complexity of the contraptions increase throughout the book. The first car can go forwards and backwards.
The second remote control car could turn in circles as well as move forward and backward.
Machine number three is a crane. This model takes a few hours to
assemble. It could move forward and backward,
and the lifting arm both rotated and lifted.
In all the kit contains instructions for five different machines.
Week 15: Remote Control Amusement Park Ride
The Thames & Kosmos Remote Control Machines kit comes with gears, small motors, a remote control, building
pieces and instructions for creating eight different remote control
vehicles. It was used in the previous lesson and can be used in follow-on lessons to expand exploration and engineering knowledge to include the creation of engineering drawings.
After completing the eight machines in the instructions, invent your own machine. Here is an example. It is an amusement park ride.
It can drive around while the arm spins around a center point.
When your vehicle is complete make a
drawing of your design so it can be improved and rebuilt in the future.
First make a parts list and then create several sketches to document your work.
Week 16: Hydraulics and Pneumatics
Assemble various hydraulic and pneumatic powered vehicles and run tests to determine how they perform.
Thames & Kosmos are producers of hands-on science kits for kids. The Thames & Kosmos Air + Water Power kit comes with about six different project ideas as well as detailed
scientific explanations for how hydraulics and pneumatics work. Follow the directions in the kit to create hydraulic and pneumatic
The blue box in the photo above is a motor which can be used with either
air or water. A black wheel was attached to the motor. It was filled
with air and the hedgehog received a wild ride. Later the motor was
tested with water in the sink.
Two identical vehicles were built and raced across the driveway.
The water squirting out the back powering the cars forward is visible in
the above photo. They were also filled with air, but the kids
determined water worked much better for this experiment.
The vehicles were tested on slopes to see how they could overcome gravity.
They were also tested on different surfaces to see how they could overcome friction.
No comments:
Post a Comment
Note: Only a member of this blog may post a comment.


.JPG)
.JPG)


.JPG)
.JPG)
.JPG)
.JPG)
.JPG)


_wm.JPG)
_wm.JPG)
_wm.JPG)


_wm.JPG)
_wm.JPG)


No comments:
Post a Comment
Note: Only a member of this blog may post a comment.