This is a five week water based unit study perfect for kids in
3rd-5th grades. This unit study covers river beds, flowing water, the water cycle and ocean currents. The lessons are activity intensive but
also incorporate books, video documentaries, research and discussions
opportunities.
Week 1 - River Beds
Week 2 - Rivers Flow When it Doesn't Rain
Week 3 - Ground Water Run-off
Week 4 - The Water Cycle
Week 5 - Ocean Currents
Week 2 - Rivers Flow When it Doesn't Rain
Week 3 - Ground Water Run-off
Week 4 - The Water Cycle
Week 5 - Ocean Currents
Week 1: River Beds
When a river is shallow and slow the water can move small bits of dirt, but when a river is full, the raging water can be strong enough to move boulders.
Many of the activities in this unit are described in the book Rocks, rivers & the changing earth: A first book about geology. Read the book slowly over the course of this unit study.
Read the book Flood: Wrestling With The Mississippi
River Bed Sediment
To learn how water moves sediment in a river bed make a riverbed channel out of a piece of cardboard folded into U-shape.
Fill the cardboard with dirt containing rocks.
Slowly pour water down the channel and collect it in a basin. Pouring slowly results in some dirt flowing along with the water. Now simulate a flood situtation by emptying the entire contents of the watering can into the channel. During a flood the river is strong enough to move large boulders and a lot more sediment.
Settling Sediment
Sediment is either suspended in water or settles to the bottom depending on the speed of water and the size of the particles. Do this experiment to see how particle size and speed effect settling.
First place some dirt into an empty water bottle.
Add some water and swish the bottle slowly allowing it to settle. During slow movement, only the smallest sediment is picked up by the water.
Repeat the experiment with rapid swishing. More sediment will be mixed with water.
Add different materials to new bottles and repeat the experiment to see how they settle.
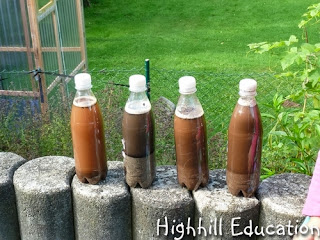
Examine at intervals of 15 minutes.
After sitting for an hour the different layers of sediment should become distinctly apparent.
Wait 24 hours and examine the water bottles again. This shows how the sediment sinks to the bottom in a pond or very slow moving river.
Settling Trail Mix - The smallest materials sink to the bottom.
To reinforce the concept of the smallest materials settling on the bottom and biggest settling on the top, make trail mix and shake it up.
Mix almonds, walnuts, peanuts, raisins, date pieces, dried fruit and tiny chocolate chips in a large container with a lid.
Agitate the container gently and watch the raisins and chocolate chips move to the bottom while the almonds and walnuts rise to the top.
Week 2: How do rivers flow when it doesn't rain?
Water always flows down hill. On its way to the ocean water may flow over a water fall, through a canyon, or into a delta. When it rains, water seeps into the ground where it is stored. If the ground is saturated, after the rain, some water continues to trickle out of the ground and flow into streams. If the ground can hold the water, additional water is not released. That's why sometimes rivers dry up during periods with no rain, but other rivers continue to flow.
Continue reading the book Rocks, rivers & the changing earth,: A first book about geology as a reference. In addition, read the book Geography from A to Z: A Picture Glossary (Trophy Picture Books)
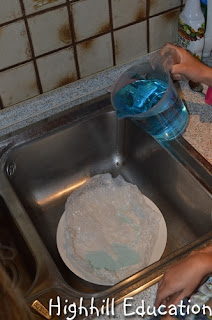
To demonstrate how water always flows down hill and how it flows during periods without rain, use a washcloth to represent the ground, a plate to represent the hill, a crumpled up sheet of wax paper so the ground isn't smooth, some water and a few drops of food coloring.
Place the wax paper on a plate resting in a tilted position. Pour water onto the upper end of the plate and observe the flow of the water.
Here it formed a river.
After adding more water a lake is formed at the base of the river.
Reposition the wax paper and repeat the experiment several times. In this version the water forms several waterfalls.
In this photo, the water forms a lake which splits in two to reach the sea. - A Delta
Next add the washcloth to the top of the hill to allow the ground to soak up water.
When the rain ceases, the rivers continue to flow.
Week 3: Ground Water
Continue reading Rocks, rivers & the changing earth,: A first book about geology. Water flows in a continuous cycle throughout our world. Water that falls onto mountains runs down the side into streams, which flows into rivers that run into lakes and seas. Eventually water is evaporated back into the air, rises, and falls as rain again.
Read The River
Sometimes after a rain the creeks, streams and rivers are full and other times after a similar rain they flow at low levels. The difference depends on how wet the ground is. If it's full of water, or saturated, to begin with, the additional water from the rain flows down, but if the ground is dry, it can be absorbed.
To demonstrate the difference place two dry washcloths, to represent dry ground, on top of an upside bowl, to represent a mountain.
Simulate rain by pouring water onto the mountain.
As the ground (or washcloths) become saturated rivers begin to form and run down the mountain.
Repeat the process several times.
Week 4: The Water Cycle
Read The Magic School Bus Wet All Over: A Book About The Water Cycle
Then challenge the kids to find ways to convert water, ice, or steam into water, ice or steam.
Converting water to steam by breathing on the window.
Create a cloud by putting hot water in a glass and covering it so the steam can not escape.
Converting steam to water by covering hot water and putting ice on the top to create a greater temperature difference and increase the speed of condensation.
Week 5: Ocean Currents
Did you know that there is an area in the Pacific Ocean filled with floating plastic that is as big as the state of Alaska? It wasn't discovered until the 2000's and scientists are studying its growth and toxic effects. Some of the trash comes from container ships, but much more is thought to have originated on land and arrived by flowing down rivers and streams into the sea.numerous videos on this topic available on youtube. Research and discuss one or two.
The trash is all moved by surface currents swirling around in the ocean. Their existence has been known for centuries as they have been used to aid navigation. Like rivers on land they can and do change their course. The Northern Hemisphere contains two main gyres which spin clockwise, and the Southern Hemisphere contains three counter-clockwise spinning gyres. Where the gyres meet, the water traps debris in a never-ending loop thousands of miles across.
In addition to the gyres which circulate water on the surface, the ocean contains deep circulation currents which move the water between varying ocean depths. When water freezes at the poles, the remaining water contains more salt and therefore is more dense. As the water increases in density it sinks.
Watch the move Atlas 4D, Hawaii linked below which is primarily about Hawaii, but includes lots of information about the sea and explanation deep circulation currents.
Add one tablespoon of salt and yellow food coloring to one glass of water. Heat a second glass of water and add red coloring. Chill a third glass and color with blue food coloring.
Fill a tub was one-third full with room temperature water. Gently pour the salt water into the tub.
It is more dense and should sink to the bottom.
Next, add warm water.
It is less dense than room temperature water and therefor settles on top.
Add the cold water and watch it sink to the bottom.


No comments:
Post a Comment
Note: Only a member of this blog may post a comment.