There are layers above the Earth, just like there are inside it. Our atmosphere is comprised of five layers; troposphere, stratosphere, mesosphere, thermosphere and exosphere. Over the past 60 years scientists have done extensive studies on the various layers. In the 1950's Joseph Kittinger performed a series of high altitude jumps. Project Excelsior was an important precursor to space exploration. From 19 miles above the ground, in the stratosphere, he made his final successful jump.
Oxygen fills our atmosphere, but it hasn't always been that way. Over 2.5 billion years ago tiny cyanobacteria were the first known living organisms. They were able to convert the carbon dioxide in the atmosphere into oxygen. Today, oxygen is produced by green plants which contain an organ which was derived from cyanobacteria.
After watching the video, we did several activities to learn more about our atmosphere.
How the Earth Works (How It Works)
Activity 1: Atmospheric Layers - Blankets
Materials
5 blankets
The first activity was so quick and simple, yet lots of fun. The kids laid on the floor and were covered with the five atmospheric layers. As more blankets were added they could feel the weight of the atmosphere upon them.
Activity 2: Air Expands as it Rises
Materials
glass
straw
cooking oil
As air rises it expands because, the pressure decreases. There is less atmosphere or weight on top of it. To show that air expands as it rises, an air bubble was blown into a glass of cooking oil. As the bubble rose, it was possible to see it increase in size.
Activity 3: Air Pressure
Materials
Hot Water/Steam
Cold Water/Ice
Empty Water Bottle
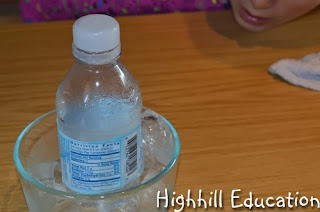
Even though air cannot be seen it is a powerful force. Our bodies are uniquely designed to withstand the pressure. To visually see the power of air pressure, hot air was cooled inside a plastic bottle. Because the air was sealed inside the bottle, the amount of air could not change.
As the hot air cooled, it took up less space. When this happened the weight of the outside air was strong enough to crush the plastic bottle allowing us to see the power of air pressure.
First, a small amount of water was boiled on the stove.
Next, the water bottle was filled about 1/4 inch deep with water and the quickly sealed by putting on the lid to trap the hot air inside.
Meanwhile, a bowl was filled with ice cubes.
Finally, the bottle with hot air was placed into the ice to cool the air inside the bottle. Incidentally, this process also resulted in rain inside the bottle. - Yeah - the water cycle!
Over the next 15 minutes or so the bottle was crushed by the weight of air in the atmosphere pushing in on it.
Be sure to come back next week when we make an anemometer (device to measure wind speed).

This post is linked to:
Trivium Tuesday
Hip Homeschool Hop
* I did not receive any compensation for this recommendation. I'm just a homeschooling mom who has found many products that I like. If you're interested in the products I recommend on this blog I want to make it easy for you to find them.
** I am an Amazon associate and receive a small portion of the sales on orders made after clicking in from this site, which I promptly spend on homeschooling books and supplies for my children.


This is excellent! I'm bookmarking it for when we return to our weather study. Thanks for sharing!
ReplyDeleteI like using the blankets for the layers.
ReplyDeleteDefinitely. It was so simple and really got the point across.
DeleteGreat activities! We haven't studied the atmosphere yet, so I'll definitely pin this for later!
ReplyDeleteGreat activities! We haven't studied the atmosphere yet, so I'll definitely pin this for later!
ReplyDelete